| Prowler Products By Gary | Tom Mills / Jefferson Auto |
| Home Page | Owners Registry | Discussion Forums | ProwlerMall | Event Scrapbooks | About |
| Prowler Products By Gary | Tom Mills / Jefferson Auto |
 Click here to return to the Prowler Online Board Main Page |
 ProwlerOnline, Plymouth/Chrysler Prowler Discussion Forum ProwlerOnline, Plymouth/Chrysler Prowler Discussion Forum
 Technical Questions & Answers Technical Questions & Answers
 Farmer Fuel Pump Change, You can do it! (Page 1) Farmer Fuel Pump Change, You can do it! (Page 1)
|
| Bottom of Page This topic is 3 pages long: 1 2 3 |
next newest topic | next oldest topic |
| Author | Topic: Farmer Fuel Pump Change, You can do it! |
|
onecatnodog Prowler Junkie From:arvada,co,usa |
   Some of you have known and if you don't my Prowler has suffered the Hot, Hard start! This was short timed fixed by the use of a aircraft one way fuel valve installed up by the engine fuel rail. My car has had the fuel bleed back problem when hot for over a year now and I replaced the Factory fuel pump with the SRT 4 Walbro fuel pump last Saturday night.. The only special tool needed is the wrench that I picked up for the job to remove the cap that holds the fuel pump in the tank.. Now I can do other Mile Hi Prowler cars that will need a fuel pump replaced sooner or later... This repair has been done by many and I'm not saying the way that I did it is the correct way but is the way that I did the job with great results.. The pictures and story should help others save BIG money, like I did... John(onecatnodog)Collins |
DFOTOPRO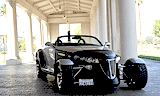     POA Site Supporter Prowler Junkie From:Redlands, Ca |
hey John did you forget the fotos??? dj |
|
onecatnodog Prowler Junkie From:arvada,co,usa |
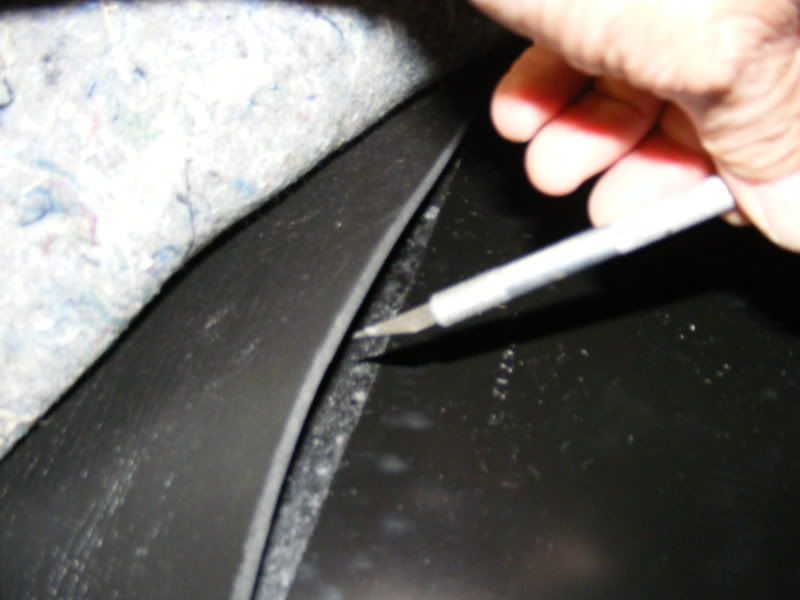
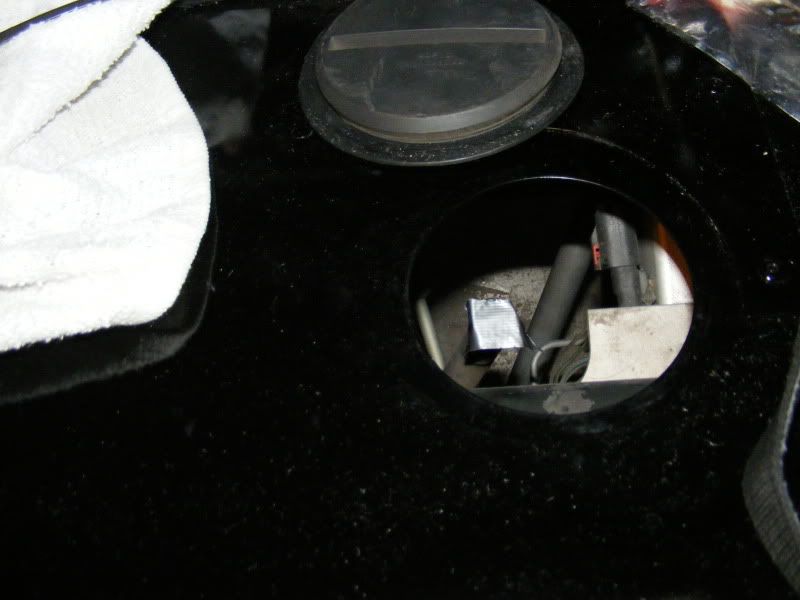
Again I will say that this is the way that I John(onecatnodog)Collins replaced the fuel pump in my Prowler and make no claim that this is the correct way to do so... First off we will start with the removel of the Junk in the Trunk, and then pull the carpet up on the driverside from bottom to top.. Same side that the Trans Dip Stick rubber plug is on... onecatnodog 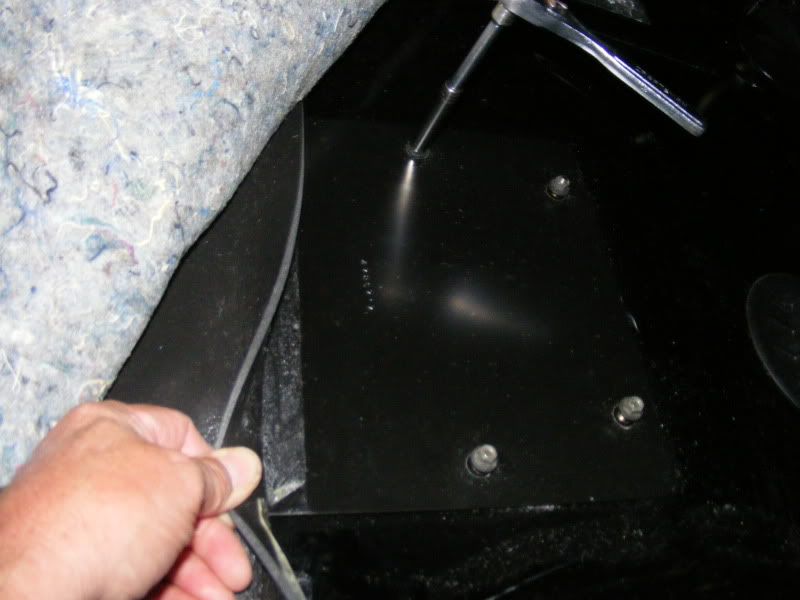 I used a hobby knife to cut back some of the glue on the rubber pad and was able not to cut the pad it's self... Then remove the 4 nuts holding the cover plate down along with two plastic push in pins at the top of the cover that is hidden under the rubber pad that had the glue on it..The plastic push pins are shown in the up coming photo.. This will expose the fuel tank top when removed.. onecatnodog |
|
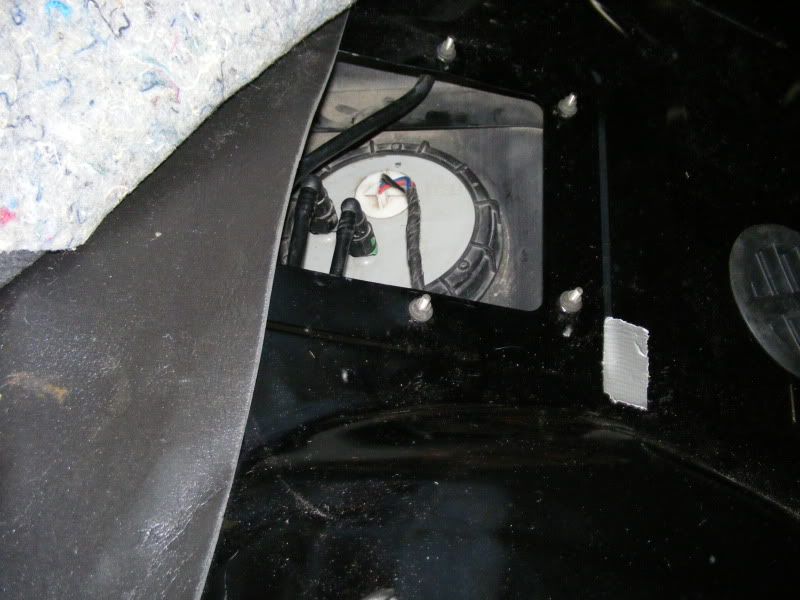
onecatnodog Prowler Junkie From:arvada,co,usa |
The Fuel Pump is under this cap shown in this picture that takes a special tool to remove it... I was able to pick up this tool at a big discount as they had 4 in stock and have never sold one and will use it to help out my Mile Hi Prowler members when their pumps fail.. onecatnodog
|
|
onecatnodog Prowler Junkie From:arvada,co,usa |
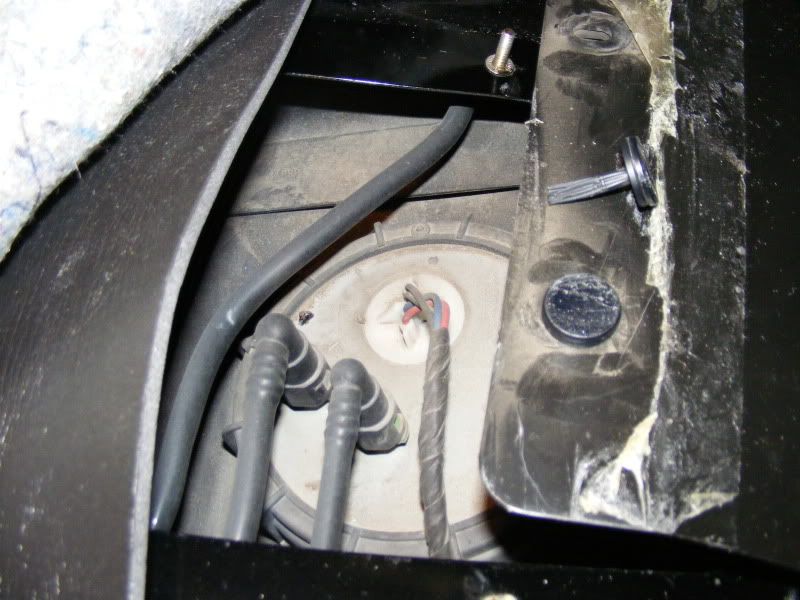
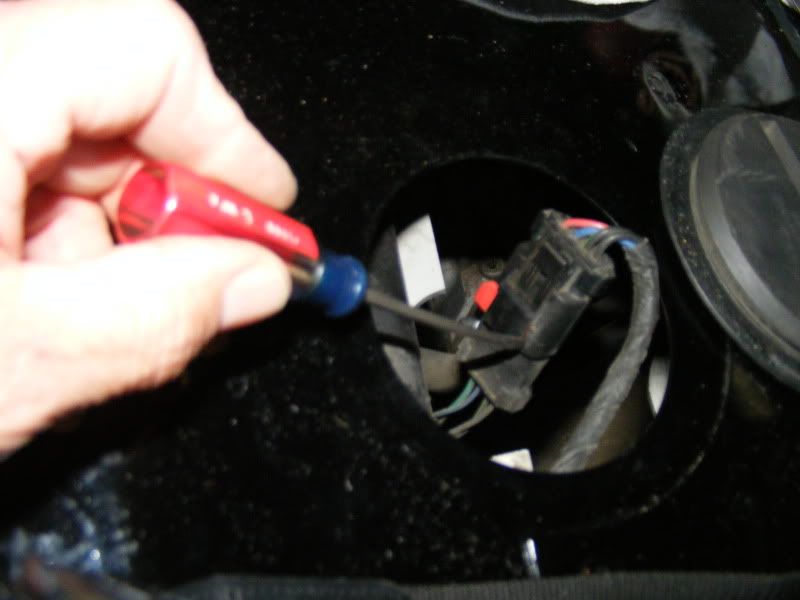
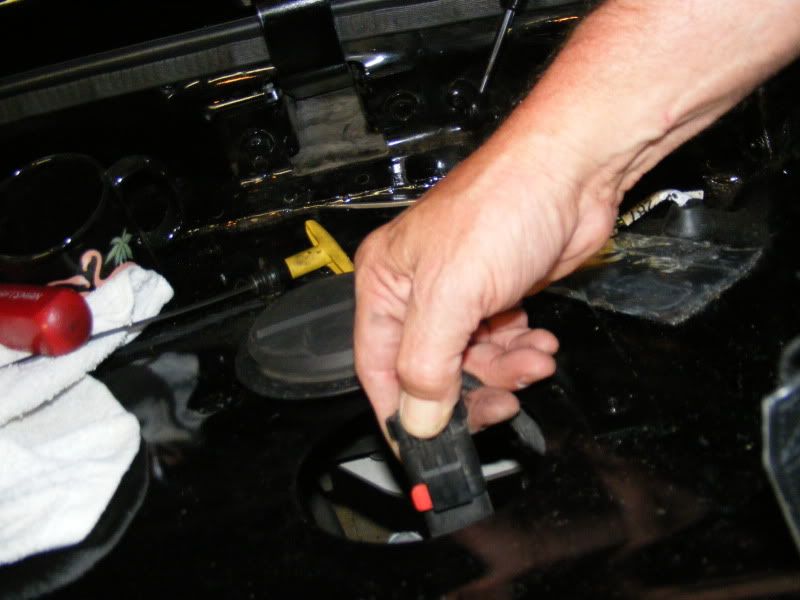
I then removed the rubber plug that covers the trans dipstick and right close to that you will find the power plug that feed the fuel pump.. It has two christmas trees that hold it to the frame rail and a pry tool can be used to work the christmas trees out of the frame giving you greater ability to unplug this connecting with out damaging it... 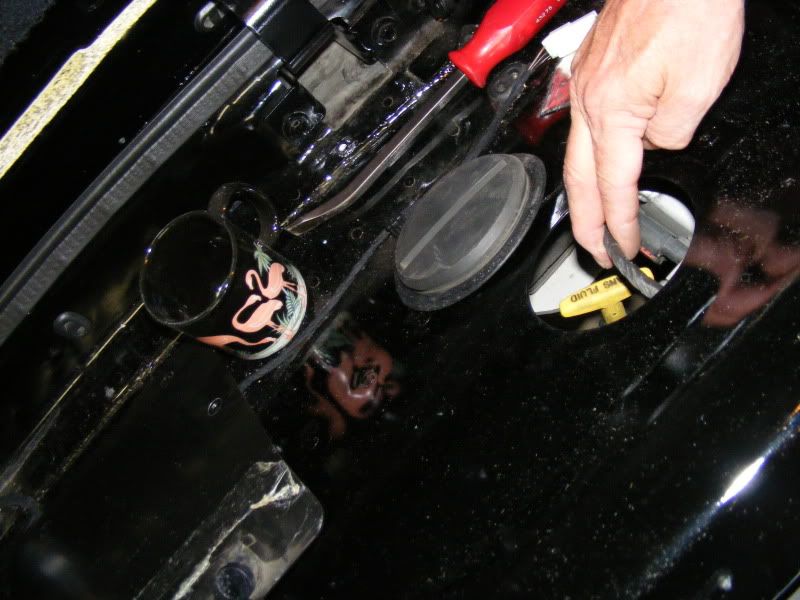
The Trans Dip Stick can be removed for more working room but I used some duct tape to cover the opening to keep dirt out of it.. onecatnodog
|
|
onecatnodog Prowler Junkie From:arvada,co,usa |
 This plug has a red safety lock made into it and must be slid to the open spot to unplug it.. After it has been slid in the open position PUSH DOWN on the black release (do not pry up) while pressing down work the plug back and forth to separate it...
This message has been edited by onecatnodog on 06-03-2009 at 11:40 AM |
|
DFOTOPRO POA Site Supporter Prowler Junkie From:Redlands, Ca |
thanks for the great fotos, will wait for the remainder to appear...always good to see others share their way to a repair dj |
|
onecatnodog Prowler Junkie From:arvada,co,usa |
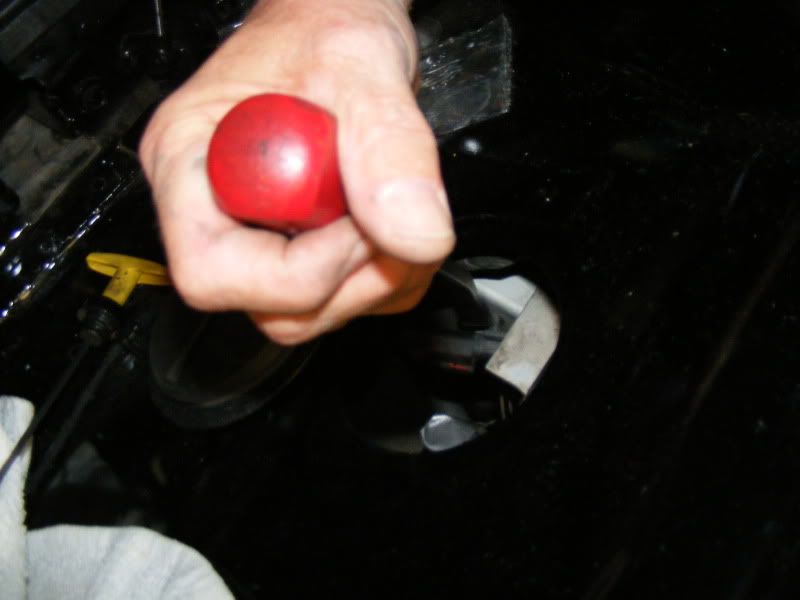
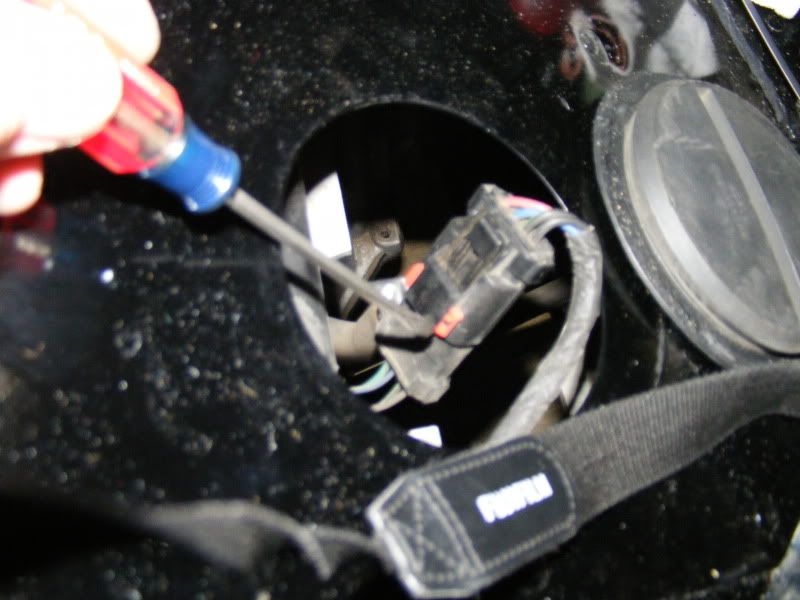
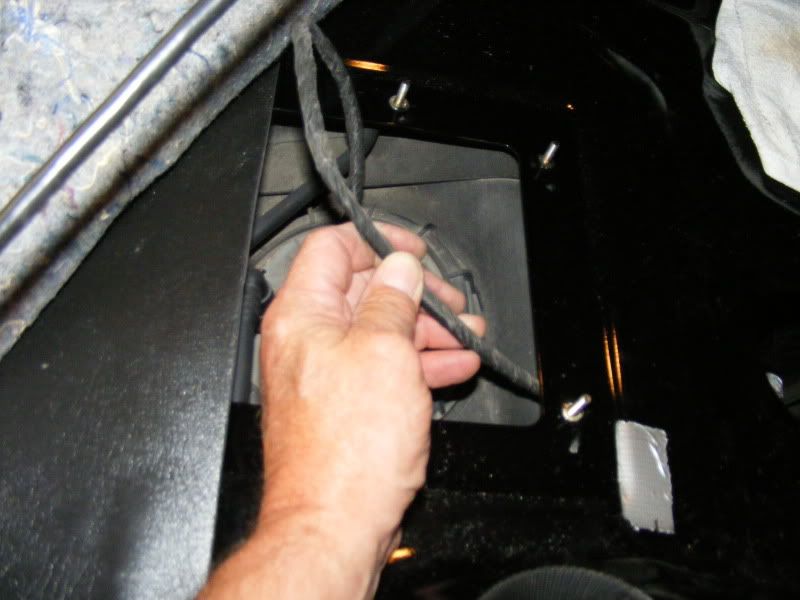
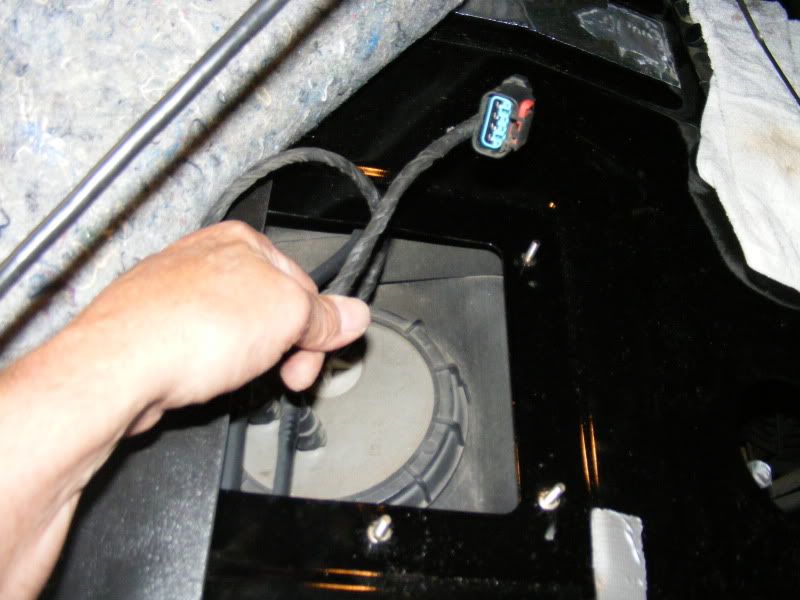
This is the push DOWN tap that I was talking about and not the pry up type... It will unhook the connections from each other with a wiggling action while pulling apart as long as you have the red safty lock in the open posistion.. onecatnodog 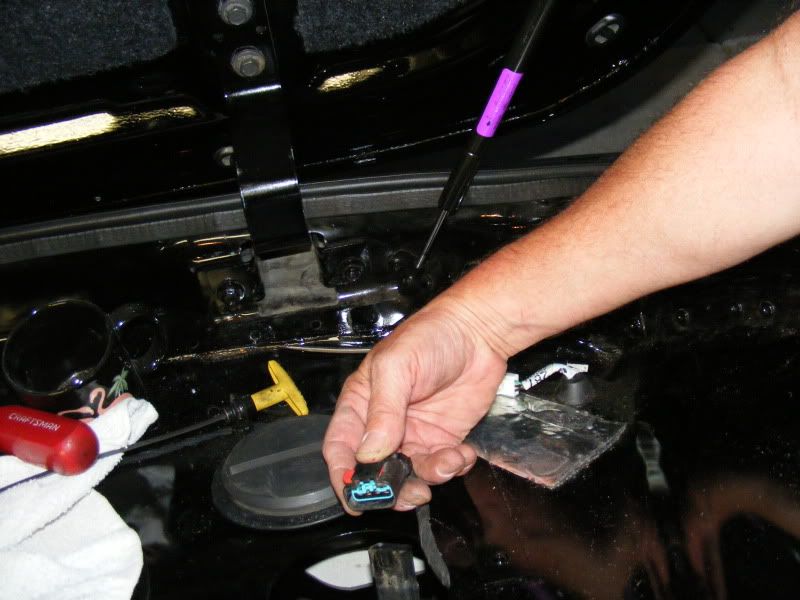 When they are separated you can fish the long set of wires from the pump that is located under the plastic cap and lay the cord in the trunk...
|
|
onecatnodog Prowler Junkie From:arvada,co,usa |
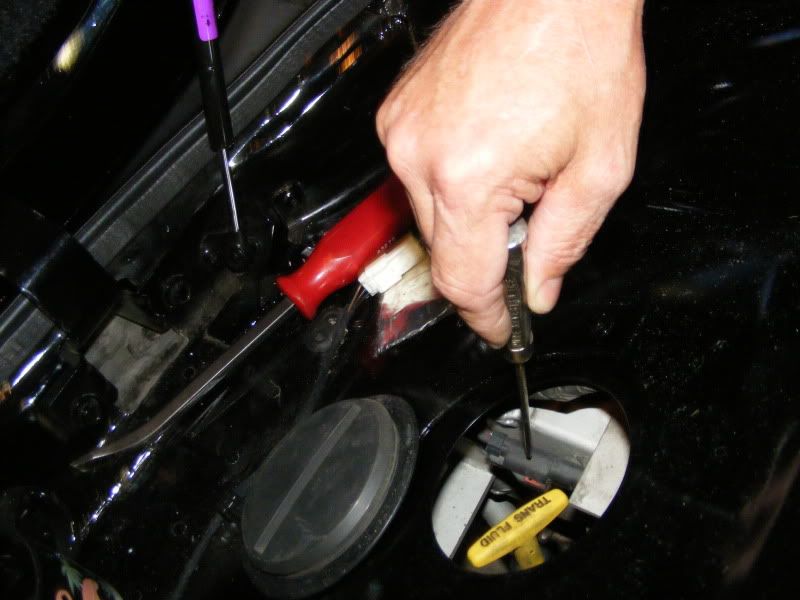
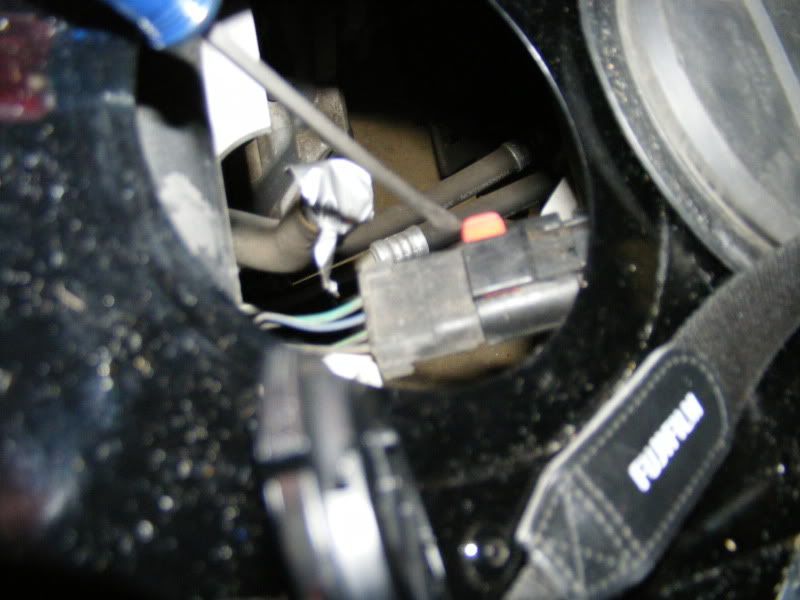
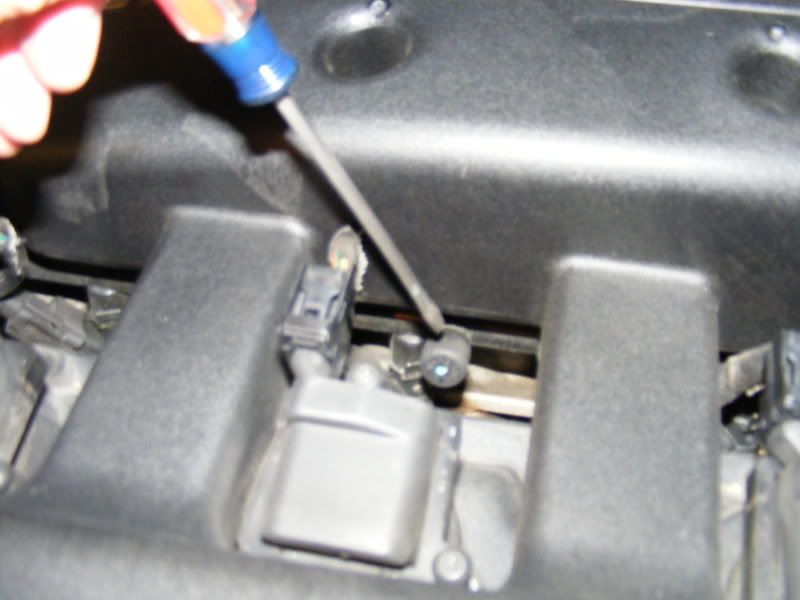
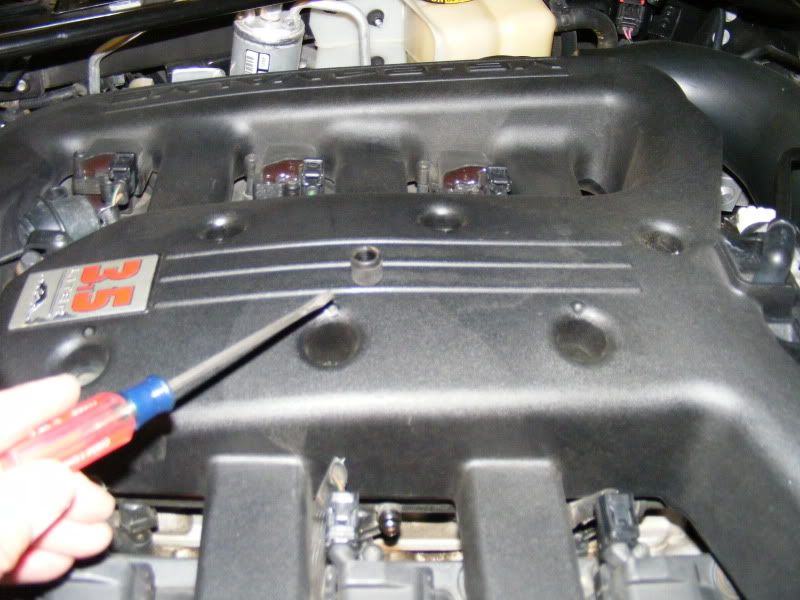
This next step needs to be dealt with in caution as it involves FUEL as you will be bleeding the pressure out of the line and pump up by the Fuel Rail at the Factory installed valve that is located on the drivers side of the engine and has a cap on it and is shown in this picture... Kind of like a Tire Valve Stem ..
Remove the cap and be careful not to drop it... If you need more room to remove the cap the coil pack can be removed but I didn't have to do that.. This picture should give you a idea of where below the intake on the driver side that it is located at and is just below the center coil pack... onecatnodog This is what the cap looks like when removed... The valve is show good in this picture.. |
|
onecatnodog Prowler Junkie From:arvada,co,usa |
With towels all around the valve I used a small screw driver to push down on the center of the valve while being covered with a towel..... This step HAS to be done to prevent a mess and de pressurize the fuel system.. When ever working on fuel systems NEVER USE A DROP LIGHT!!!! Use a battery style Flash Light if you need more light... 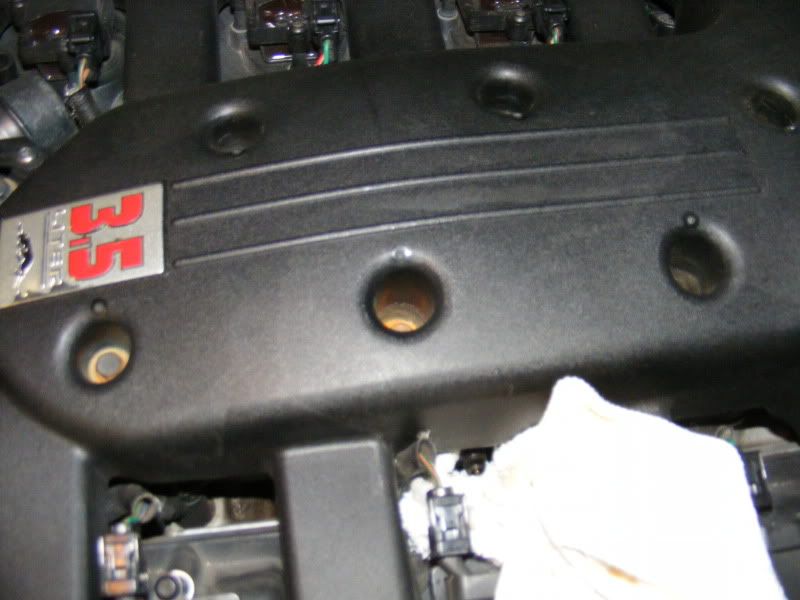 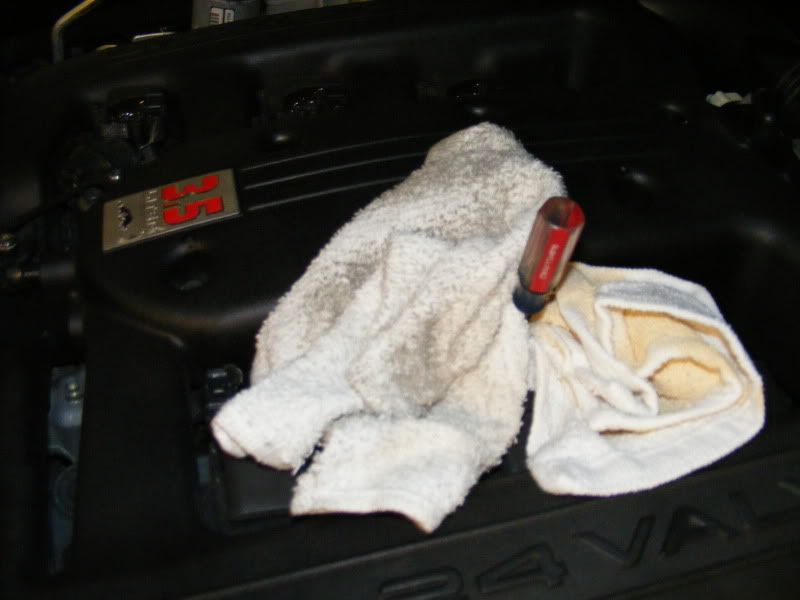 When the pressure is bleed away replace the cap back on the fuel rail... onecatnodog When the pressure is bleed away replace the cap back on the fuel rail... onecatnodog 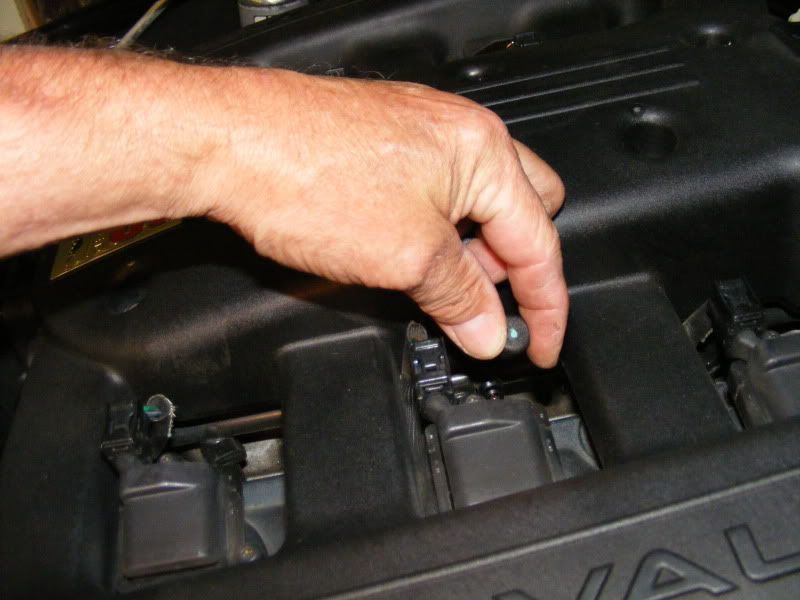 |
|
onecatnodog Prowler Junkie From:arvada,co,usa |
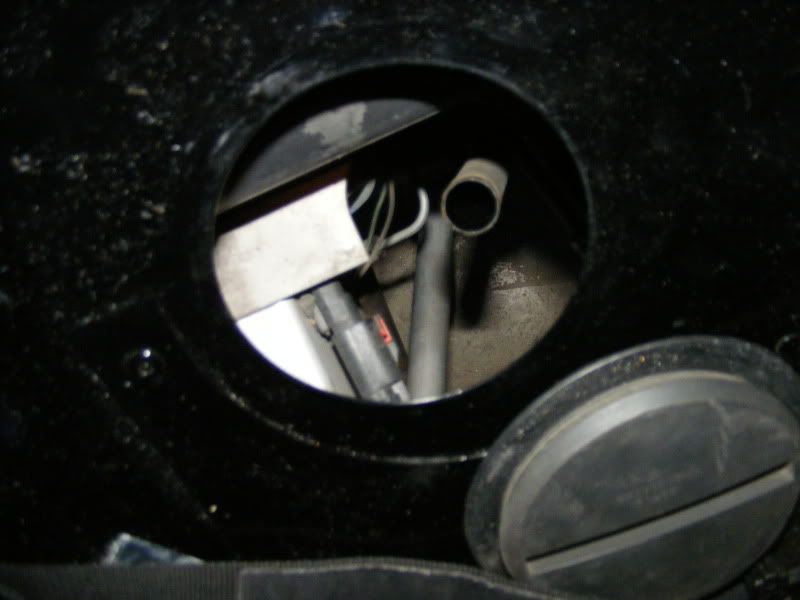
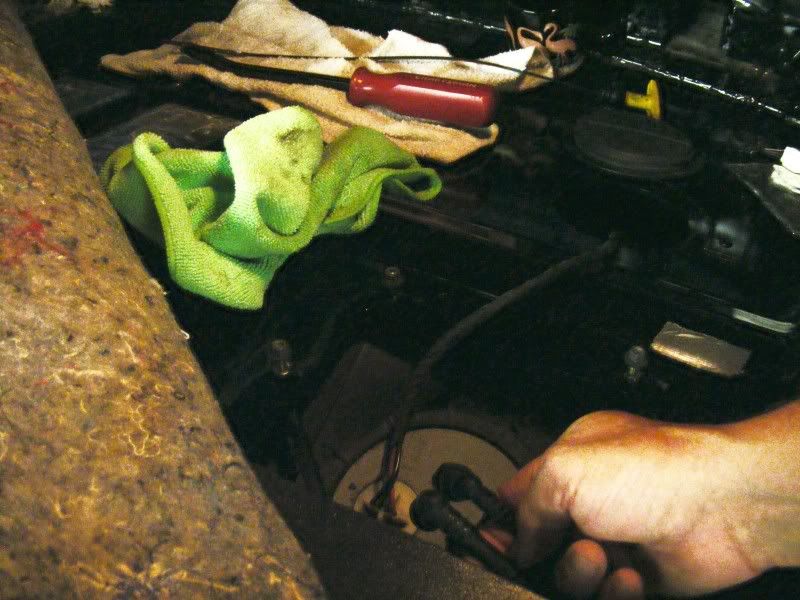
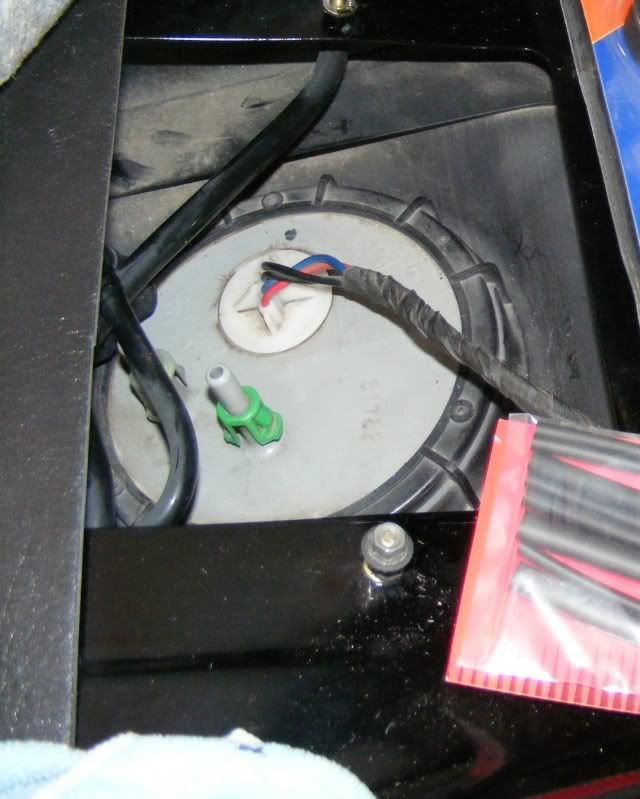
I used a fiber towel to remove any dirt on the fuel tank cap before I attempted it's remove.. There are two fuel lines that go to the fuel tank cap and they have push in releases on either side and can be removed with a pinching action while pulling up.. The two lines are of different size and these have to be taken off first... I used the towel again to soak up any gas that came out of these lines and used it to clean the cap again.. onecatnodog 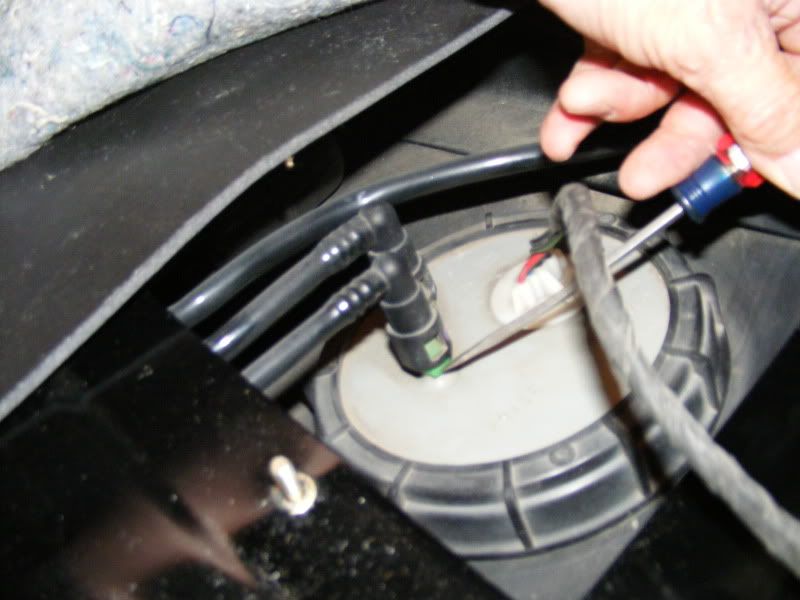
|
|
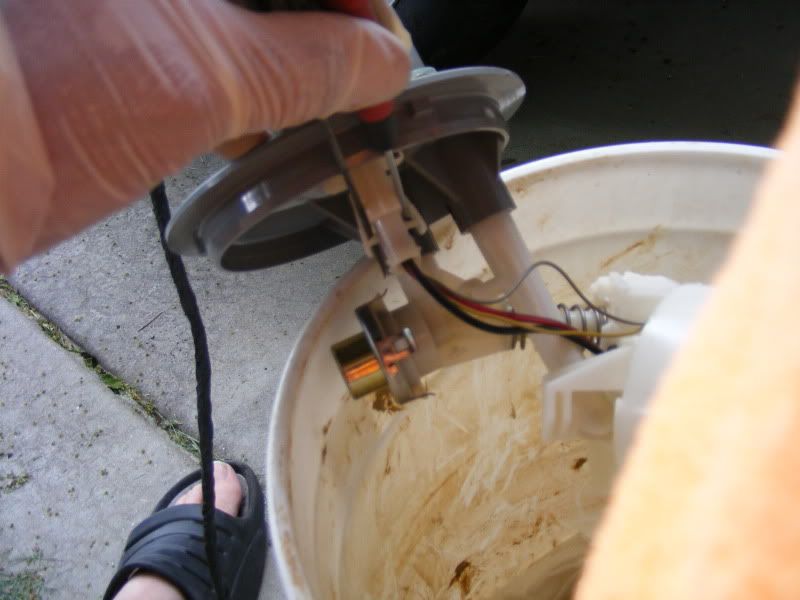
onecatnodog Prowler Junkie From:arvada,co,usa |
Using a marker, I marked the outer trim ring and the center section that holds the pump for reference for re assembly.. The tool in the picture is a MUST to get the fuel tank cap off, and I will be more than happy to help out other Mile Hi Prowler owners using this tool.. This tool is adjustable and can be made to fit tight on the cap.. The cap turns like most things to remove and that is counter clock wise and takes a little effort to remove... onecatnodog 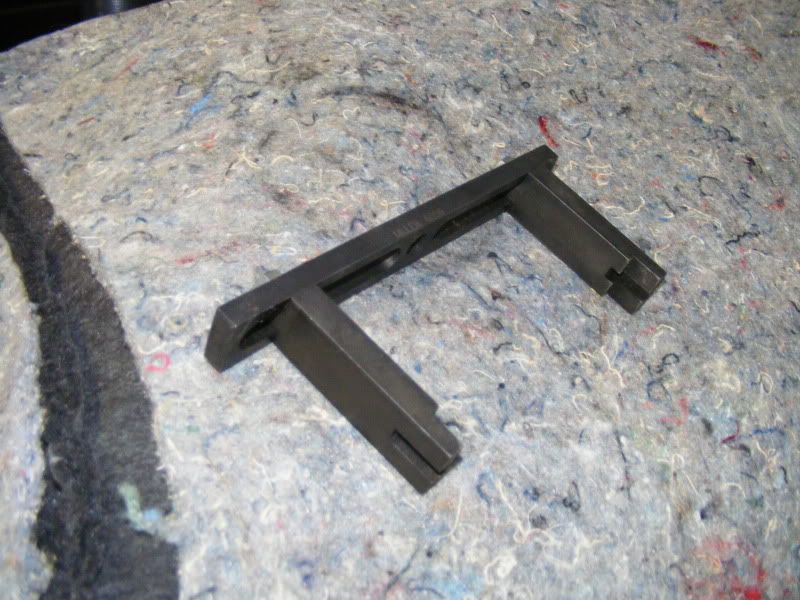 |
|
PhatBoi Prowler Junkie From:Sacramento |
Man! I've been looking for that tool! Where did you get hat from??? |
|
onecatnodog Prowler Junkie From:arvada,co,usa |
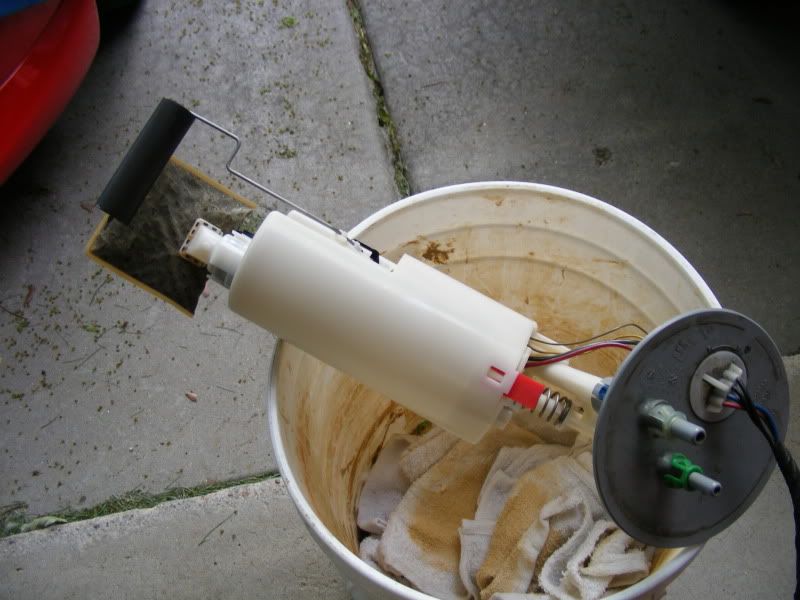
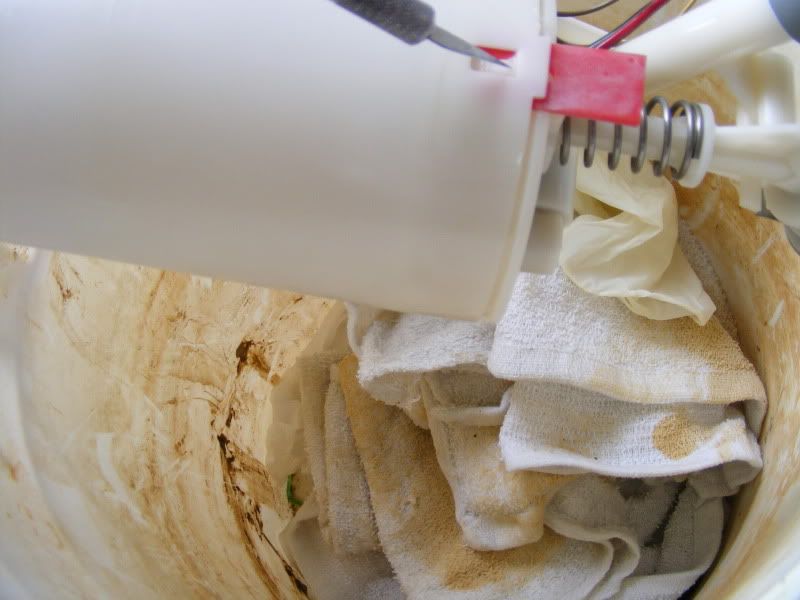
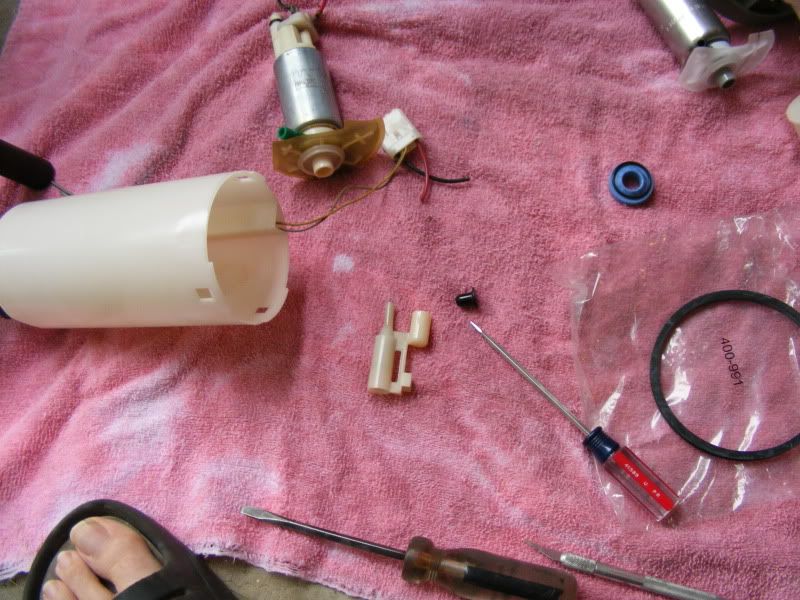
Prepare a bucket with towels in the bottom to soak up the gas that will be coming from the old fuel pump, as when you remove the pumps holder complete with pump inside make a quick trip with it straight to the bucket to keep the gassy mess at a minimal.. onecatnodog 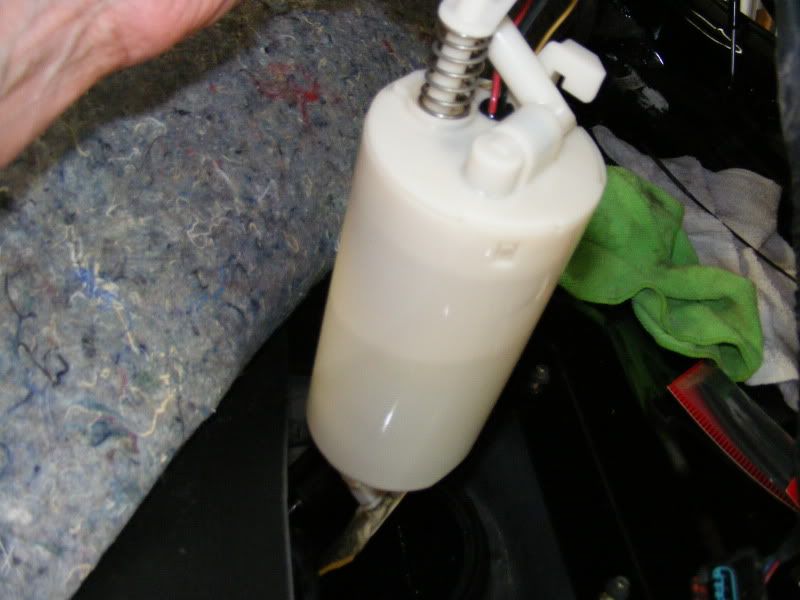
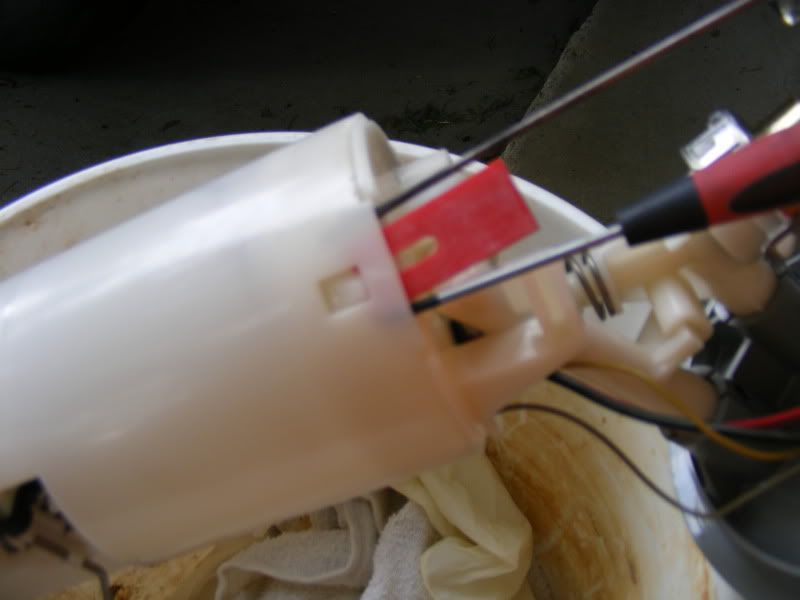
One red plastic wedge tool was supplied with the Walbro Fuel Pump Kit and can be seen it this picture.. It takes some work along with small screw drivers to split the holding tabs of the fuel pump incasement.. Be CAREFUL not to crack the plastic and the wedges with the screw drivers helped BIG TIME when inserting a larger screw driver between top and bottom half to pry it apart to gain access to the pump..
This message has been edited by onecatnodog on 06-17-2009 at 07:20 AM |
|
onecatnodog Prowler Junkie From:arvada,co,usa |
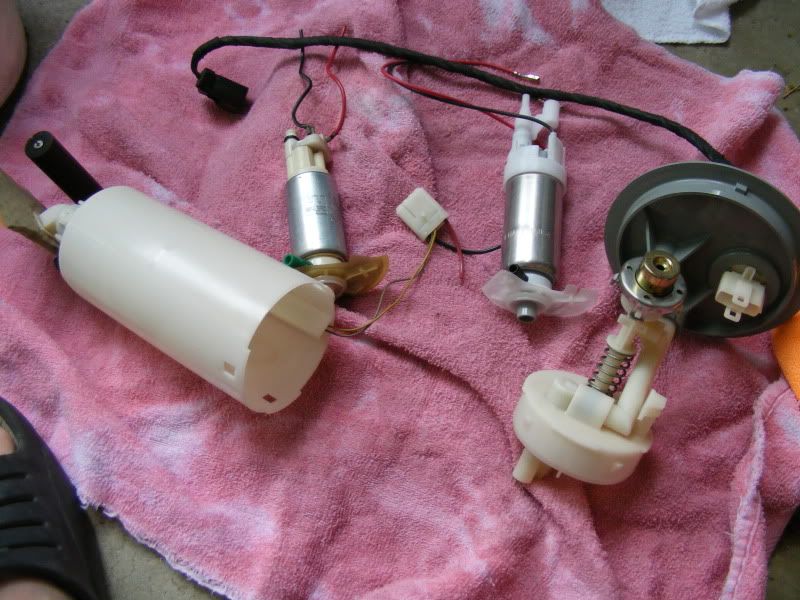
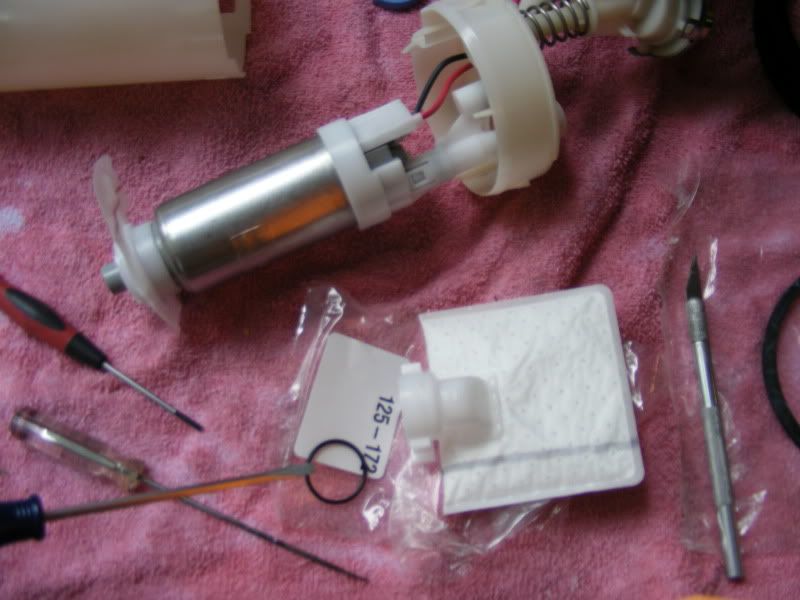
Pictured here is the plug of the fuel pump its self and unplugging it you will be allowed to separate the pump from the pump housing.. 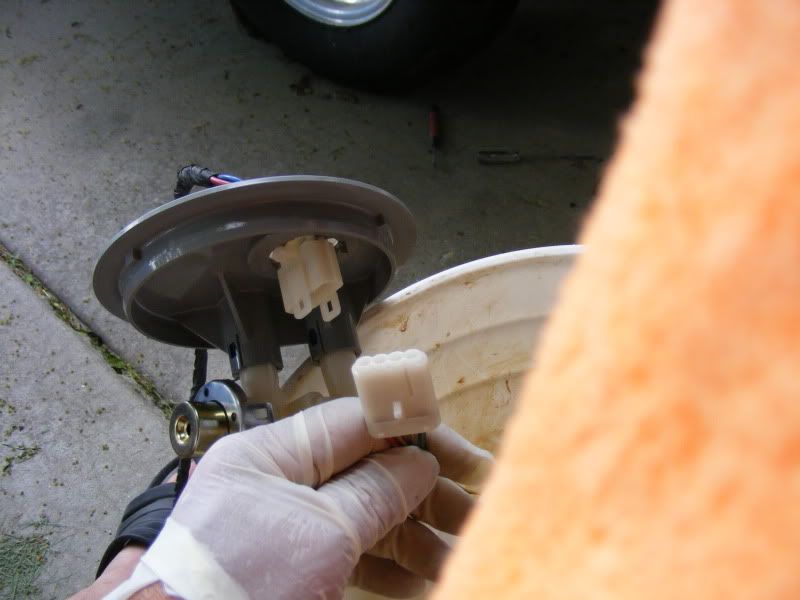 The New Walbro SRT 4 Pump is much larger but will fit and give more Gallons Per Minute and pressure than the factory pump.. The end plug is different but can be easily made to work and comes with new filter and O ring to make the switch.. New pump to the right and old one to the left.. Great improvement as I have picked up a Complete 3.5 Prowler Engine with a Paxton Super Charger a few months ago and the new pump will help it get the fuel that it needs to run if I put it in my Prowler.. onecatnodog This message has been edited by onecatnodog on 06-17-2009 at 07:21 AM |
|
onecatnodog Prowler Junkie From:arvada,co,usa |
Cut the TWO BIG wires One Black One Red on the old fuel pump (NOT THE TWO SMALL WIRES) as the small ones work the fuel guage. When working with the fuel pump assembly be careful not to damage the float unit that reads the gas level and make sure that it has the free up and down movement.. The big wires run the pump and these are the ones that you want to cut.. This wires have to be cut to get them through the rubber grommet.. Use a paper clip to push in the locks on either side of the wire were it goes into the plug and they will pull right out, with a little work. 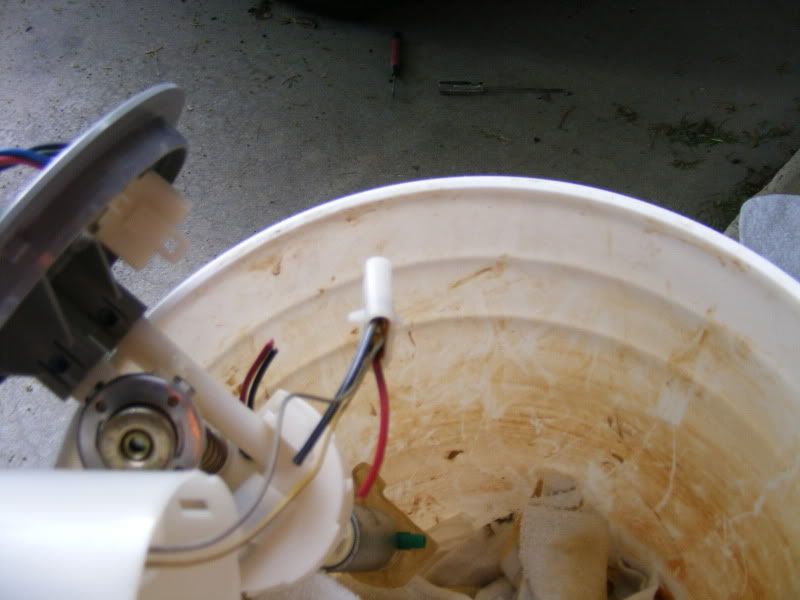 |
|
onecatnodog Prowler Junkie From:arvada,co,usa |
There will be extra parts left from this kit as the pump that you are replacing the Prowler pump with is for a Turbo SRT 4 Neon and will more that fit the bill of your Prowler needs.. onecatnodog 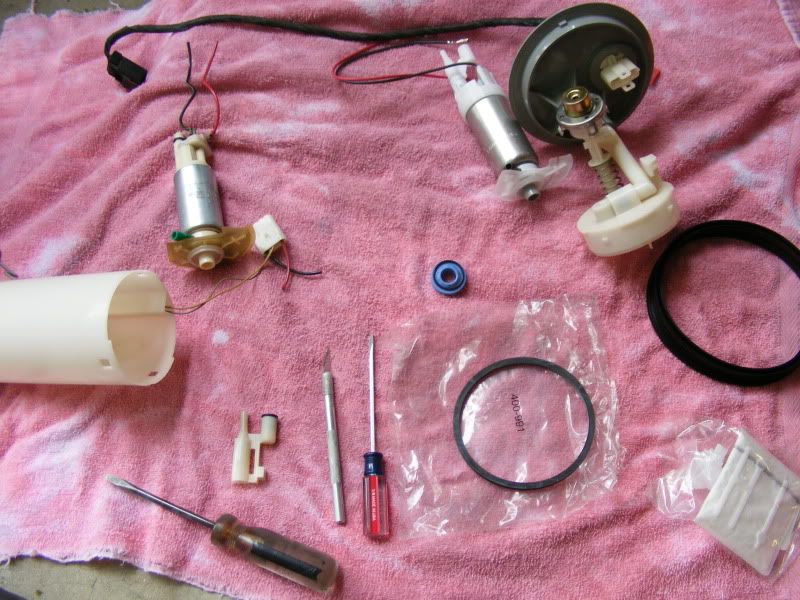 |
|
onecatnodog Prowler Junkie From:arvada,co,usa |
The wire ends also will need to be cut from the new pump so they can be pushed through the rubber grommet that you pulled the old ones thru.. 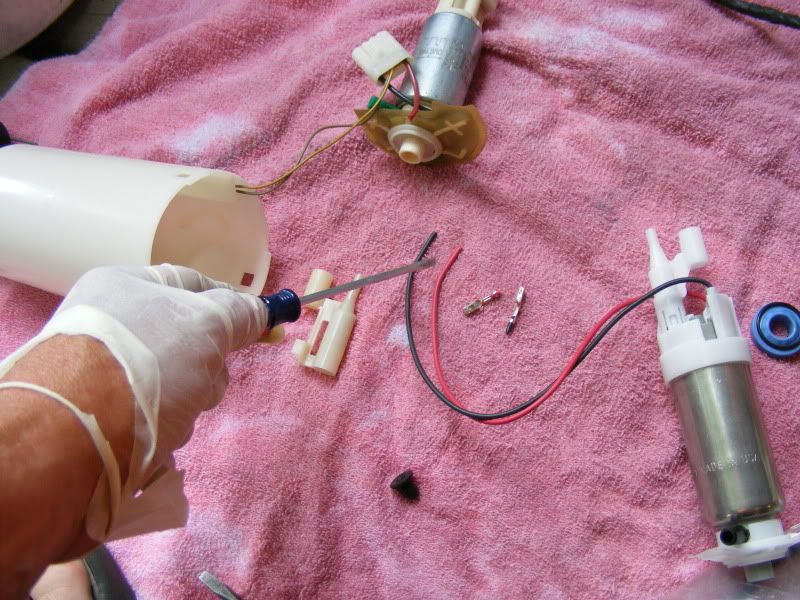 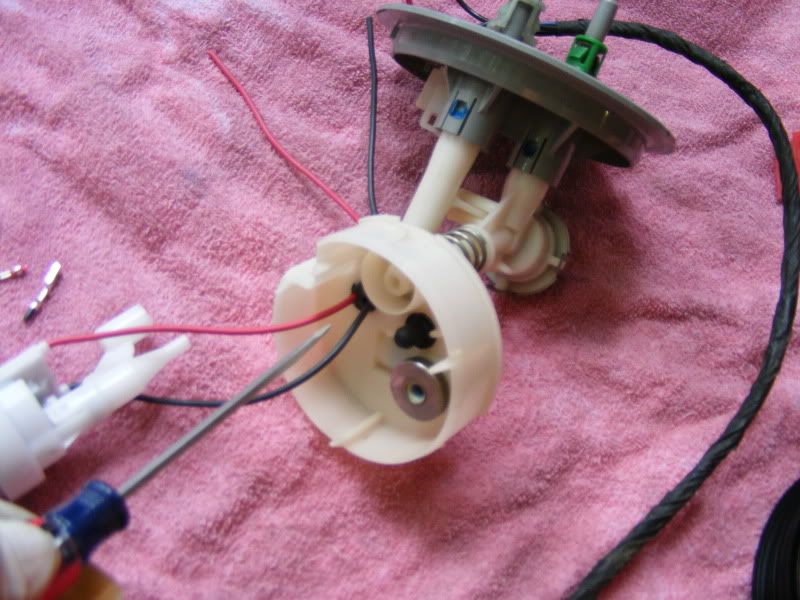 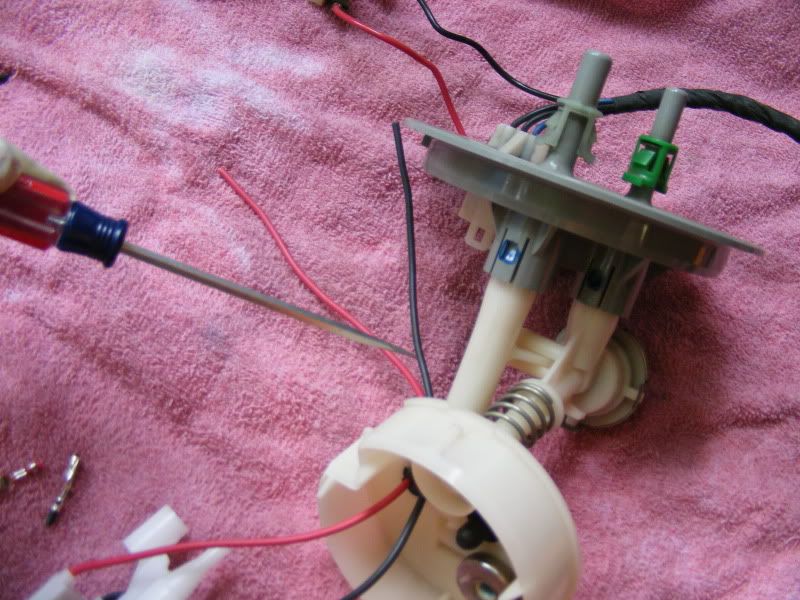 |
|
onecatnodog Prowler Junkie From:arvada,co,usa |
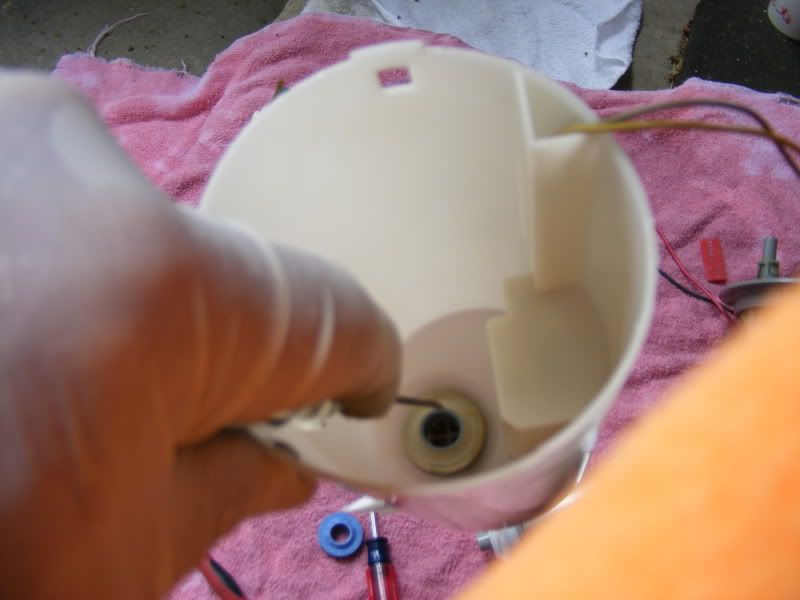
Here is a picture of the cannister top that will hold the fuel pump .. This is a great picture of the rubber grommet that you pushed the wires through earlier(but not yet in this picture).. The reason I am showing this picture is so you can see were the rubber pen cap plug goes that helps hold the fuel pump in place... The pump sets down on the cap.. 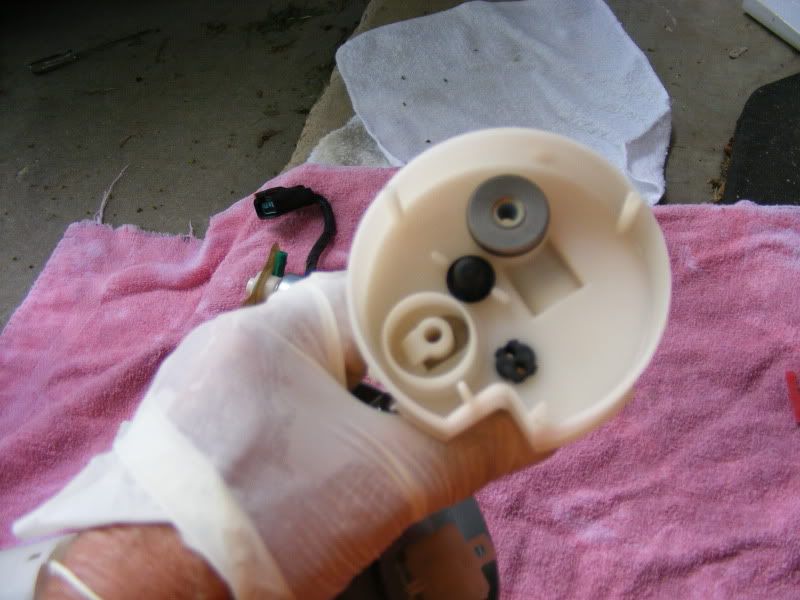 The black rubber cap in the second picture has the screw driver pionting at it and is re-used from the old pump. |
|
onecatnodog Prowler Junkie From:arvada,co,usa |
In this picture you can see in the center of the picture the pen style cap with the pump is pushed in place on, and the wires running through the grommet... onecatnodog 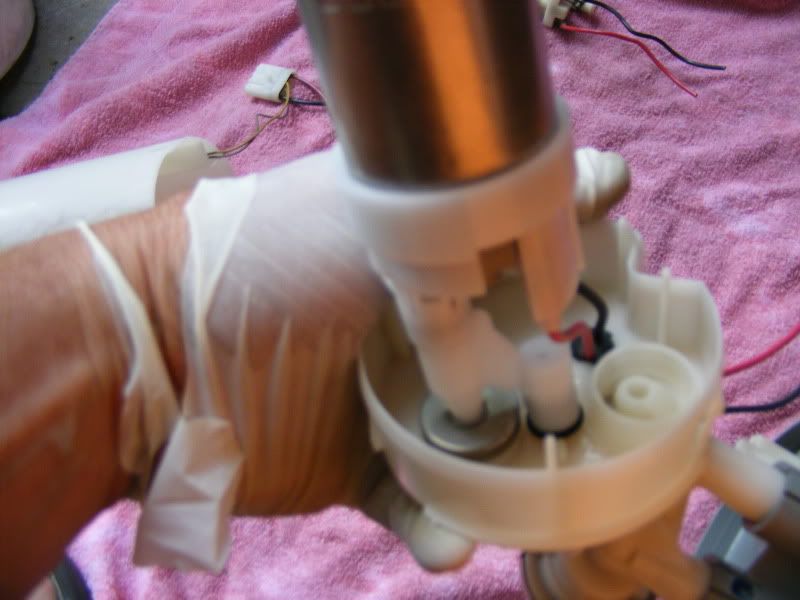 |
|
onecatnodog Prowler Junkie From:arvada,co,usa |
Next to change is the fuel filter and that is located on the bottom of the 2 section cannister.. This Walbro Kit comes with a new filter and the O ring that seals it.. Use the small screw driver again so that the filter pick up can be removed with out damage, making the new one a snap in job... 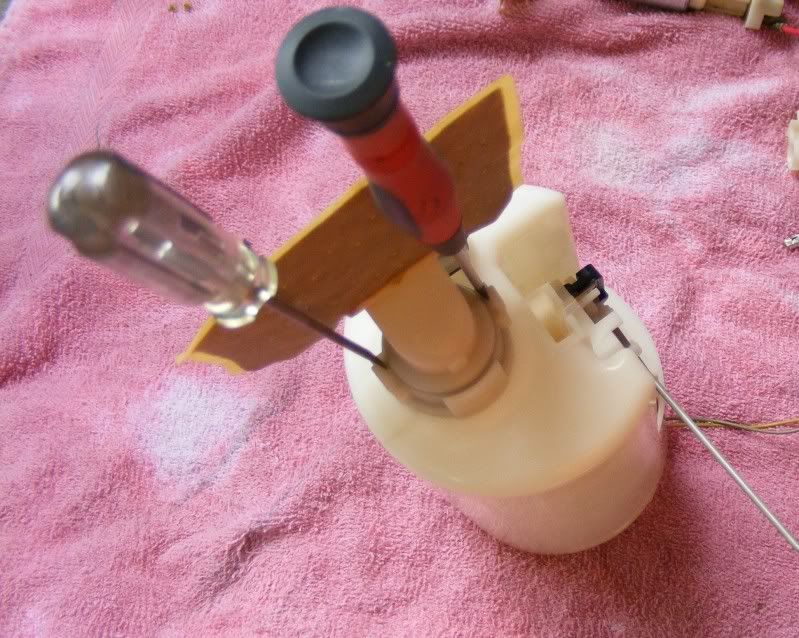 Picture of new filter and O ring.. O ring in place it's ready to go on.. This filter pick up can only go on one way so no worry... onecatnodog |
|
onecatnodog Prowler Junkie From:arvada,co,usa |
Make sure that the filter is snaped in all the way around and the small screw drivers can be used to do so.. onecatnodog 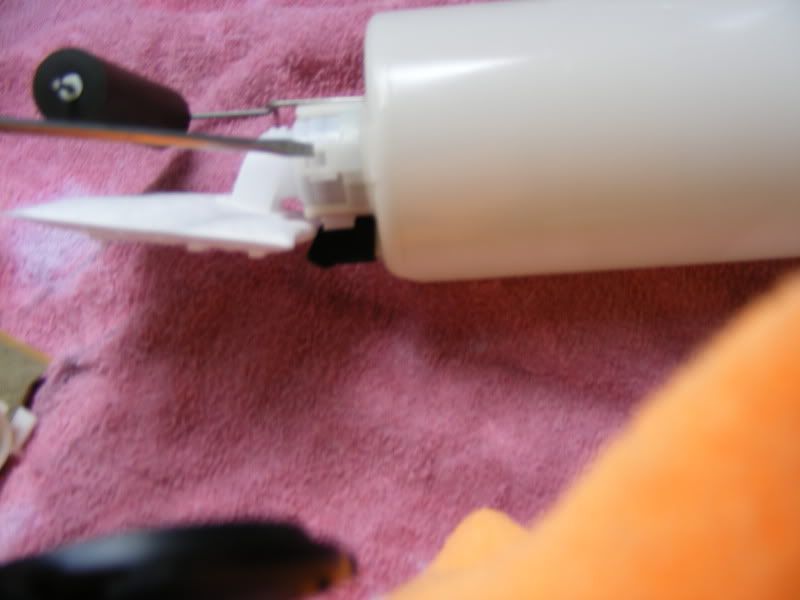 Check this picture out as on the towel there is a blue large O ring and it needs to go into the long lower half of the 2 section cannister.. Dig the old one out with a screw driver and push the new one in... |
|
onecatnodog Prowler Junkie From:arvada,co,usa |
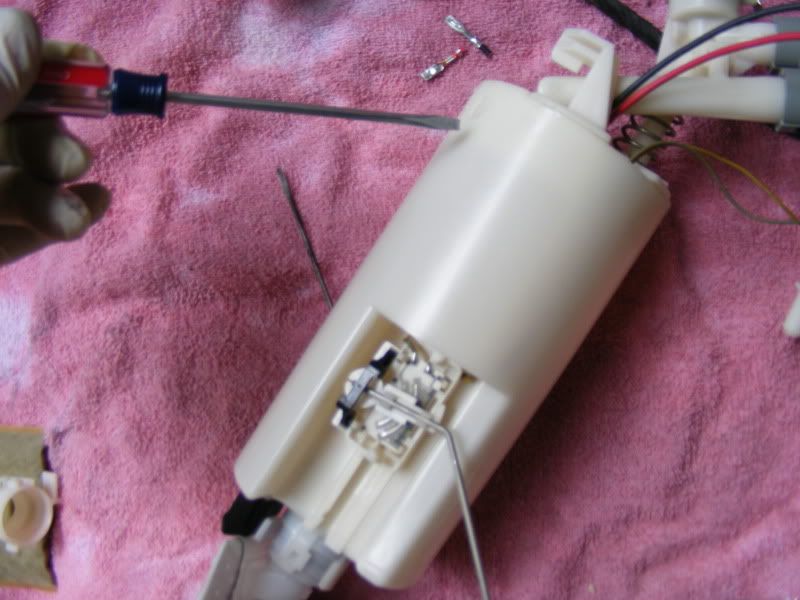
With the pump installed in the top half of the cannister and the lower half of the cannister having the filter and O rings installed the two halfs can be put together as one.. I used the small screw drivers to get it back together with no damage and ready to install back in the car... 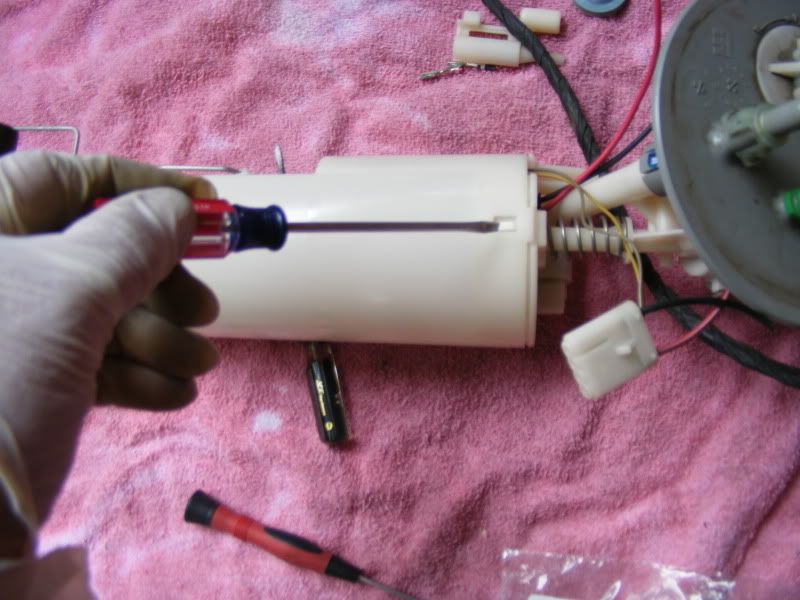
|
|
onecatnodog Prowler Junkie From:arvada,co,usa |
With the old parts in the top of the picture make sure you plug the new pump in were you soldered the new ends on the wires before you install it in the tank... I removed the tank top O ring thats under the tank cap and the fuel pump cannister.. Brought it into the kitchen sink and ran hot water on it while I stretched it a little to make the cap easy to install with out the gasket getting cut because it had shrunk up... 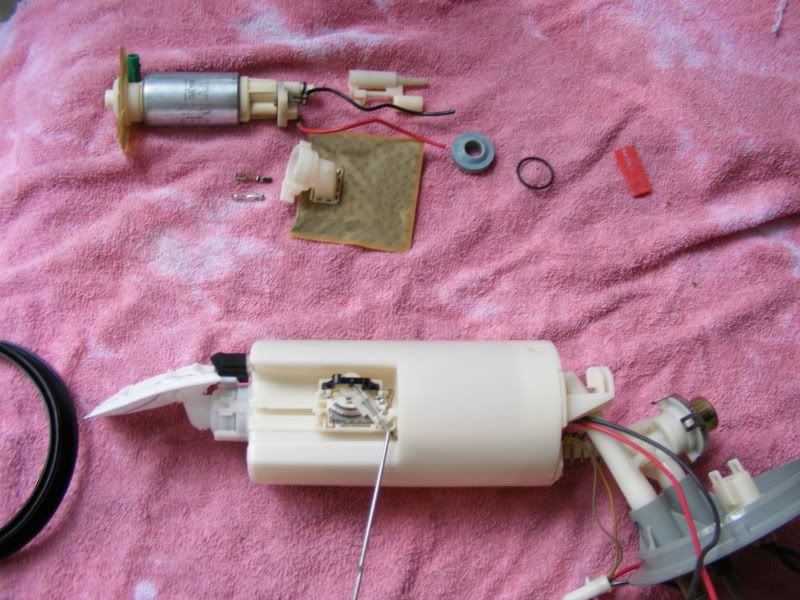 use your marker marks to get it in the same place were it was pulled from and it makes it easier to install in the correct direction in one shot drop it in.. |
|
onecatnodog Prowler Junkie From:arvada,co,usa |
With the fuel pump power supply plugged in and put back against the frame like it was, start the car and check out the performance of your install... Before putting the cover back on in the trunk test drive the car and check for leaks doing stops and turns... Bring it back home and if no problems put the access panel back in the trunk like you took it out... I am not going to say that this is the correct way to do the change but is the way that John(onecatnodog)Collins was able to repair his Prowler... 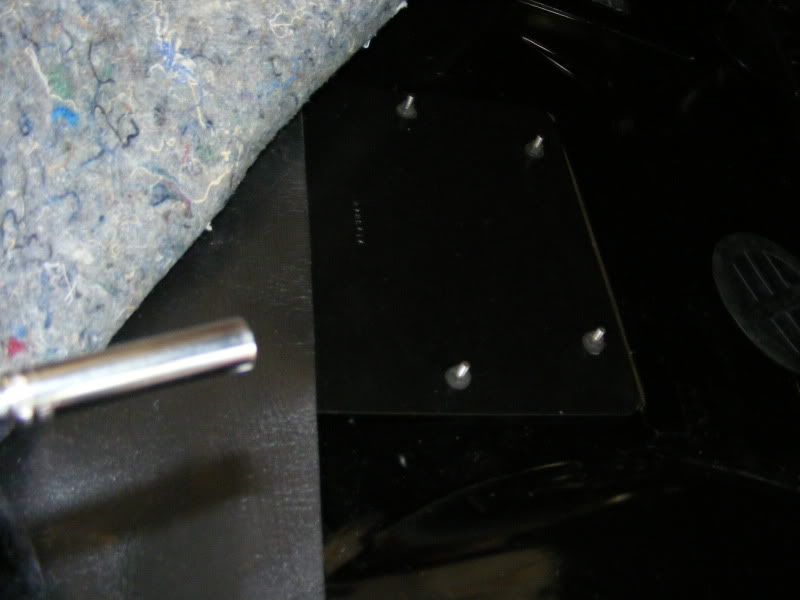 It sure was nice going to the track for the Prowler/Viper Shootout and not having to double or triple key the ign. when the car was hot to get the car to start. It started first time every time and made it a great day... Of course going home with a trophy for racing wasn't bad either... Especially when I got home Tuesday from work and there was a check from Bandimere Speedway that came in the mail for my effort.. |
This topic is 3 pages long: 1 2 3 All times are CT (US) Top of Page Previous Page | Return to Technical Questions & Answers next newest topic | next oldest topic |
  |
|
All material contained herein, Copyright 2000 - 2012 ProwlerOnline.com
E-Innovations, LP


