| Prowler Products By Gary | Tom Mills / Jefferson Auto |
| Home Page | Owners Registry | Discussion Forums | ProwlerMall | Event Scrapbooks | About |
| Prowler Products By Gary | Tom Mills / Jefferson Auto |
| Bottom of Page This topic is 2 pages long: 1 2 |
next newest topic | next oldest topic |
| Author | Topic: Dash Cover Removal |
SPCL-T    POA Site Supporter Prowler Junkie From:Portland, Maine, USA |
   Just curious - What is the trick to removing the Dash Cover from the Prowler? I'm thinking of getting some pin-striping done, and would like to remove the panel, to make life a little easier for the artist. The Service manual doesn't explain the procedure very well. Any suggestions or advise would be appreciated. Thanks. |
pumpkin  POA Site Supporter Prowler Junkie Visit Waleke's World Personal ScrapBook From:Las Cruces, NM, USA |
The trick is to push down on the corners near the windshield and pull towards you. It has a real tight fit. It is like everything else, you think you might break something, but hopefully you won't. Hope this helps.
------------------ More 'Pumpkin' photos . . . . . More cars and other stuff New pictures in Personal Scrapbook (02/23/03) |
1buddyc   POA Site Supporter Prowler Junkie From:San Antonio Texas USA |
 Pumpkin/Norm You always have great insight and terrific pictures! Buddy Pumpkin/Norm You always have great insight and terrific pictures! Buddy |
CTProwler POA Site Supporter Prowler Junkie From:Sherman CT USA |
They are a talented Couple!!!  ------------------ |
|
pumpkin POA Site Supporter Prowler Junkie Visit Waleke's World Personal ScrapBook From:Las Cruces, NM, USA |
quote: That was nice of you to say. Thank you. ------------------ More 'Pumpkin' photos . . . . . More cars and other stuff New pictures in Personal Scrapbook (02/23/03) |
|
pumpkin POA Site Supporter Prowler Junkie Visit Waleke's World Personal ScrapBook From:Las Cruces, NM, USA |
Here are a couple of more pics:
|
Northern Cat POA Site Supporter Prowler Junkie From:Stoney Creek, Ontario, Canada |
We found in the Smokies the trick is to be standing out side the car and use the method decribed above..
------------------ |
WildCat              POA Site Supporter Prowler Junkie Personal ScrapBook From:North Louisville, Indiana, USA |
quote: if you notice around the gauge opening 6 tabs sticking out......these are the clips that hold the panel in.....the 4 on the top of the panel are for location but have no clip to hold them in I made a tool out of a putty knife. It was a stiff blade 1 1/2" wide. I made a 1/4 hook on the end so I could hook the dash panel. Placed a towel on the dash and let it go under the tool when pushed to grab the dash panel (my fingers were too fat to get ahold of the dash) with your other hand, get ahold of the dash between the speedo and the gauge to the right wiggle and pull straight back on the tool and your other hand ------------------
This message has been edited by WildCat on 09-23-2003 at 03:01 PM |
jmcant1 POA Site Supporter Prowler Junkie From:DFW |
Just curious... but what task prompted the rest of you to need to remove your dash? Mike |
|
pumpkin POA Site Supporter Prowler Junkie Visit Waleke's World Personal ScrapBook From:Las Cruces, NM, USA |
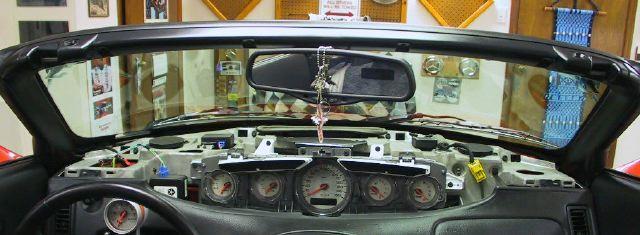
It certainly helps to have small hands/fingers. After working on it for a few minutes we finally figured it out by accident. The way we were able to remove the dash was that Pat pushed down in the top corner near the windshield and Norm pulled at the front corner of the dash and then it released real easy. Now that we knew the trick, we went to the other side and it came off very easily, . Putting it back on was a breeze, just slide back in place. |
|
pumpkin POA Site Supporter Prowler Junkie Visit Waleke's World Personal ScrapBook From:Las Cruces, NM, USA |
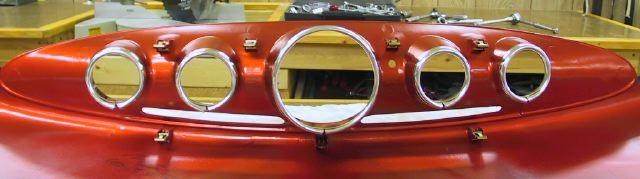
quote: Wanted to install some rings around the gauges and removed it to access the dash from behind.
And in the future we may need to remove the dash to hide wires, if we hardwire a radar detector. And also to access speakers. This message has been edited by pumpkin on 09-23-2003 at 03:49 PM |
|
Kurtis POA Site Supporter Prowler Junkie From:Nebraska |
Pumpkin: Those chrome rings are awesome. Is that the same AlleyCat grille treatment chrome door edge guard stuff? Very nice addition that I would like to copy. Also, in another post I asked about stopping a dash squeak with velcro (soft side). Anyone done this? How do you know where to place the velcro? |
|
pumpkin POA Site Supporter Prowler Junkie Visit Waleke's World Personal ScrapBook From:Las Cruces, NM, USA |
quote: Yes they are. As for copying, go for it. Don't send any money to Alley Cat This message has been edited by pumpkin on 09-24-2003 at 05:00 PM |
idive POA Site Supporter Prowler Junkie From:Texas USA |
Can't remember who's pic this is but it looks like another pumpkin pic. Velcro locations are marked with the arrows.  ------------------  |
|
Kurtis POA Site Supporter Prowler Junkie From:Nebraska |
Pumpkin, you're the best. Thanks for the great idea. As far as the dash squeak - I was searching past posts yesterday and found one that indicated lubricating the hood hinges may solve the problem????? Needless to say I was skeptical, but thought I would try the easiest thing first. I shot the four hinge points on both sides of the hood with WD-40 and took Red for a spin - NO SQUEAK! The wealth of knowledge on this sight is amazing. My POA supporter check is in the mail. |
|
Kurtis POA Site Supporter Prowler Junkie From:Nebraska |
Made myself a Larry Mayes "putty-knife-dash-puller" tool the other night - perfect! Thanks for the tip. Would have never gotten the dash out without the idea. |
jd2ksilver POA Site Supporter Prowler Junkie Personal ScrapBook From:Mt. View, CA |
Pumpkin, I must say that is one idea I think I may like with the door strip stuff. Any chance of posting a close up pic of the area where they butt together? Thanks, John ------------------
This message has been edited by jd2ksilver on 10-01-2003 at 10:23 AM |
|
pumpkin POA Site Supporter Prowler Junkie Visit Waleke's World Personal ScrapBook From:Las Cruces, NM, USA |
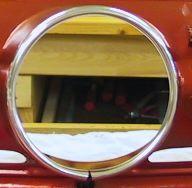
quote: Here is what it looks like from the back side, a little rough, hard to get a real good angle on the cut since it needs to be cut at an angle. I cut the first piece a little long put it on and then marked it to size. Cut it to what I thought was a correct angle then put it back on, got it pretty close, so left it as you see below (note: dash is upside down for this pic).
This message has been edited by pumpkin on 10-01-2003 at 03:34 PM |
|
pumpkin POA Site Supporter Prowler Junkie Visit Waleke's World Personal ScrapBook From:Las Cruces, NM, USA |
oops - this was a duplication. This message has been edited by pumpkin on 10-01-2003 at 03:33 PM |
|
jd2ksilver POA Site Supporter Prowler Junkie Personal ScrapBook From:Mt. View, CA |
Thanks, to whoever had the patience to do it.  Looks really good. Looks really good.------------------
This message has been edited by jd2ksilver on 10-01-2003 at 05:13 PM |
Wayne Finch POA Site Supporter Prowler Junkie Personal ScrapBook From:Toronto, Canada |
Looks great. |
padroo POA Site Supporter Prowler Junkie From:Chesterton, IN, USA |
Thanks for the pictures, they are truly worth a 1,000 words! I hate breaking stuff out of stupidity. |
|
921 POA Site Supporter Prowler Junkie From:Las Vegas, NV USA |
I just got through replacing the headlight switch and an old tool in my toolbox came in like it was made for the job. Old style brake adjusting tool like we used on 50's and 60's. Wrapped it with a towel and used to pry between the pillar post and the dash while pushing down on the dash in the corner. Perfect size and perfect angle. |
|
Silverado Prowler Enthusiast From:USA, Brooklyn |
Picture of tool, please
quote: |
|
padroo POA Site Supporter Prowler Junkie From:Chesterton, IN, USA |
I bought one of these kits and it worked great. |
This topic is 2 pages long: 1 2 All times are CT (US) Top of Page Previous Page |  Return to Technical Questions & Answers next newest topic | next oldest topic Return to Technical Questions & Answers next newest topic | next oldest topic |
  |
|
All material contained herein, Copyright 2000 - 2012 ProwlerOnline.com
E-Innovations, LP


 , this was Mrs. Pumpkin's idea and only hers???????? If you need any help email.
