Bumper Delete Part 2 Suspension Visuals $30 - Mike Mas
Hey Guys
In my last segment of my “Bumper Delete Method” we concentrated primarily on the Prowler’s required lighting and few enhancements such as; relocating the stock turn signals, adding LED turn signals and installing Fog / Running lamps.
http://www.prowleronline.com/ubb/Forum1/HTML/024095.html
In This Segment
We’ll get more mechanical, which entails improving the looks of the already beautiful “Stock” suspension parts of the Prowler. This segment like the last is accomplished for a minimal cost and also ideal for the owner who wants to retain the original appearance of his car.
As most Owners are Aware
If your willing to spend the bucks, Gary’s Prowler Store which can be found at; (www.prowlerproducts.com) offers an absolute beautiful chromed suspension service for the owner who really wants real chrome suspension parts for a show car look and willing to pay for it. If you’re looking for a more economical method; The Prowler Store (www.theprowlerstore.com) offers some nice looking stainless upgrade parts that for the most part, just slide on or cover-up your existing parts to sharpen the looks of your suspension. Other than a more economical price point, this method like mine does not require the dis-assembly of the suspension and geared more for budget conscience owners.
As You Might Already Know
When we removed the bumper & bracket, it exposed some of the previous concealed parts of the Prowler’s forward A-Frames. When these parts were manufactured, the machining and casting were not finished visually since they were not to be exposed.
What We’ll Need
The only tools needed will be a few flat files, an emery board and a few hours of elbow grease. To give the suspension a new look, we’ll re-paint the A-Frames and associated parts, add a few low cost chrome pieces available from Ace Hardware, then paint the brake calipers to complete the project.
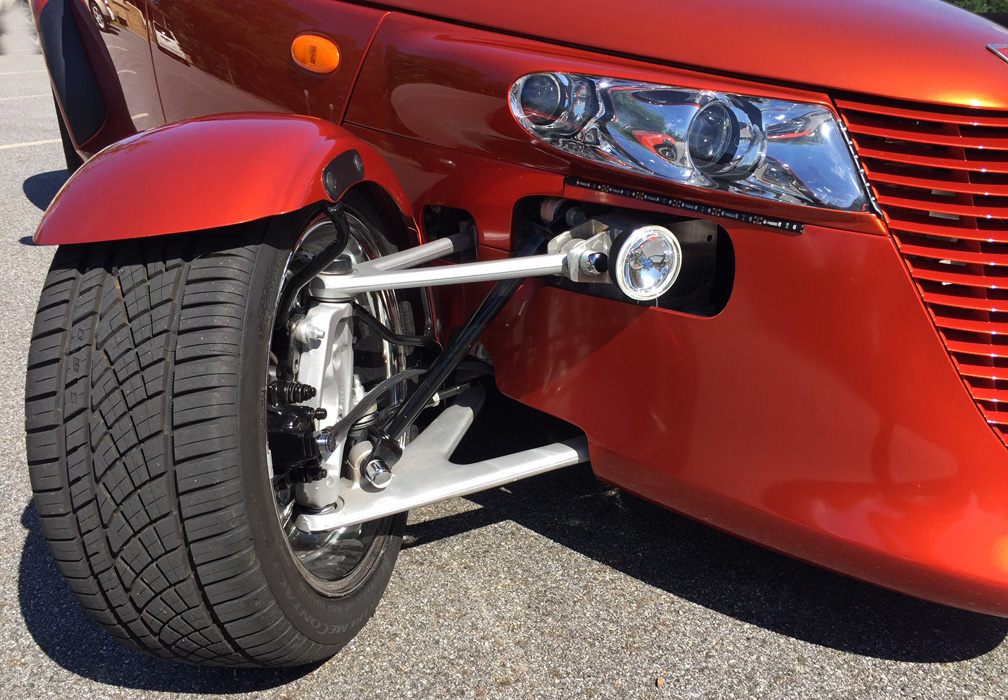
This image shows my LED lighting and Fog light improvements and the Prowler's beautiful and now enhanced suspension.
Working On The A Frames
As mentioned, when Plymouth built the Prowler’s front end, they didn’t spend any extra time on machining and polishing since they knew it would not be exposed. As we all know, one of the key unique features of the Prowler is its beautiful exposed suspension, wheels and fenders. This clearly puts the Prowler in a class of its own when it comes to visuals.
As we look at the images below at the untouched upper A-Frame support, we can see it has blunt edges and unsightly machined notches, which are not conducive to the beauty of the Prowlers front end.
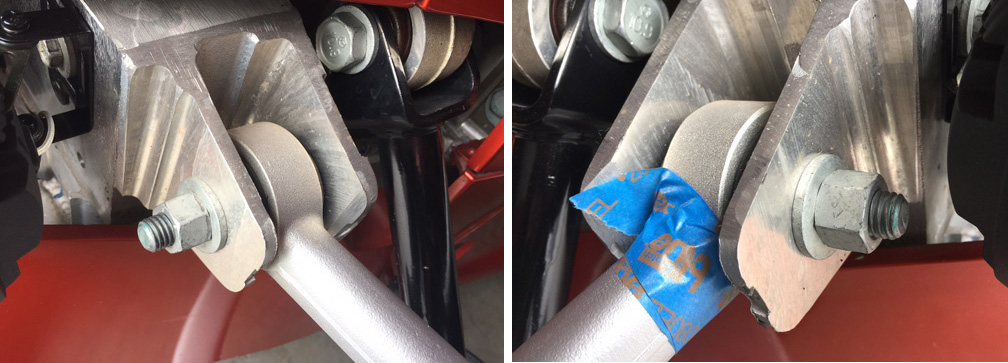
These images shows the raw finish with machine notches and rough edges.
Now Comes the Work
To start off, you’ll need a few hand files of different lengths so we can re-shape the supports to give them a finished look. To start out we’ll want to file the tops of the supports so they are flat and smooth then we’ll “Bevel” the edges a bit to give them more of a finished CNC machined look.
Removing the Notch
On the end of the supports there is a fixture slot still machined in the support which was possible used for a jig during the machine process. This unsightly slot will be removed by filing it down to have a nice straight edge. Next, we’ll want to bevel the edges as you did the top for a finished appearance.
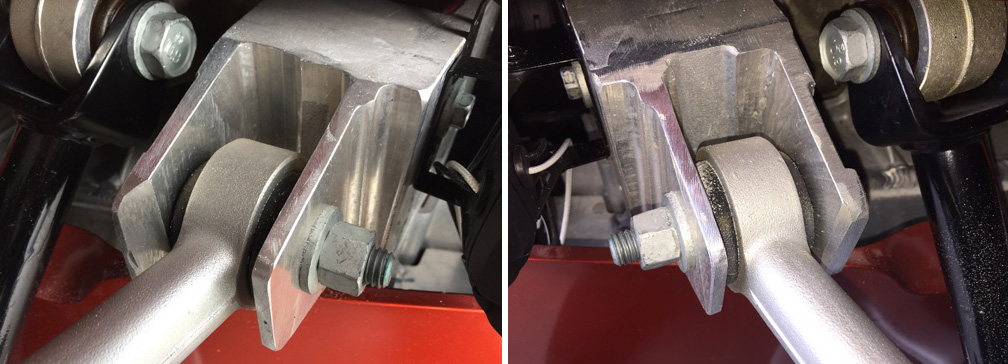
The images above shows the support with the removed notch and beveled edges.
Re-Painting your A-Frames & Steering
The exact matching color of the Prowlers A-Frames is made by Krylon Paint in a spray can and simply called; “Dull Aluminum” this is an exact match for the suspension parts and is a satin finish so it won’t show any imperfections. While this will take some patience and effort, begin with a roll of blue tape & paper to mask the black from the silver parts. Re-painting the A-Frames will bring back the “New” appearance of the suspension.
Finishing Touches
While I like the stock look on the Prowler, I felt a few chrome goodies would help out some. I’m going to order Gary’s chrome Ball Joint caps and with that I feel I’ll have enough to spark it up, yet maintain the stock Prowler look.
The large chrome caps shown in my image are used to cover up the big ugly bolts on the push-rod. These are actually just plastic bolt cover caps for a toilet and sell for a few bucks for two pieces. I used them on the lower push rod bolt and the upper A-Frame bolt. I enlarger the edge on the inside of the cap a bit to fit over the washer then just shot some real silicon in the piece, taped it in place and presto it was mounted. The little chrome caps on the brake line, are also sold at any Ace Hardware. While none really fit this bolt, I got some a bit bigger then used silicone caulk to hold them in place as well.

Here's a few chrome goodies such as these chrome toilet bolt caps used on the upper F-Frame and lower push rod bolts and a chrome bolt covers both purchased from Ace Hardware.
Painted Calipers
To complete the project, I painted my Calipers two tone - I painted the inside half black to keep with the the same stock look, then painted the wheel side to match my Prowler’s color. Since I refused to spend $45 for can of matching Prowler paint, I used some of my Kubota Orange paint which was close enough for me. It does not have to match the car finish at all, in fact, you can use different colors to enhance the wheels. Most important, while its easier to paint the calipers with the wheels off, its not necessary, in fact, I masked my wheels and painted the calipers with the wheels on. The painted calipers will make a drastic great looking change in the appearance of the wheels.

In Conclusion
It took around 2-3 hours to file the A-Frame supports and shape the brackets. Afterwards, I used my the wife’s finger nail file board to polish my work and get a nice finish look. It took about 2 hours to mask and paint the A frames and bars, then another two hours to paint the calipers.
In any case, while it took some work, it was enjoyable to see the results. Between the installation of the fog lights and LED turns combined with these suspension enhancements and calipers it made an amazing visual difference in the overall appearance of the suspension and my Prowlers overall look.
Enjoy - Mike Mas www.rotory.com


