
| Forum: | General Prowler Discussion |
| Topic: | Double-DIN solution |
| Home Page | Owners Registry | Discussion Forums | ProwlerMall | Event Scrapbooks | About |
|
|
| ||||
| Want to register? | |||||
If you have previously registered, but forgotten your password, click here.
Shouldn't be a problem...many years ago, I added an additional '12v port' off the CD player behind the pass. seat...easy to install/remove Nope, they moved the port to the center console. Actually, they gave me a standard 12V port, 2 USB charging ports, a USB port for a thumb drive and a USB port for the iPhone (to plug it in for Apple CarPlay). This message has been edited by Doyle on 08-14-2019 at 03:26 PM Theoretically, any Double-DIN unit would fit the modified bezel, as Double-DIN is an industry standard sizing. This message has been edited by skb4076 on 08-10-2020 at 01:09 PM Not having Richnew41's skill with regard to epoxy plastics and and body filler, I decided to base my bezel more on the one done for HawaiiHaze, but instead of centering the radio, I wanted to keep it more offset toward the driver's seat and keep the 12v outlet (cigarette lighter plug) and replace the auto volume switch with a small rectangular USB/Aux port to be connected direct to the new Kenwood stereo for the purpose of using Apple car play and songs from my playlist. I have taken pictures of most of the process of cutting/trimming the bezel and cutting away some of the plastic inside the dash to make room for the new stereo and and have done a "mock" installation. I will provide the info to anyone interested ONCE I AM COMPLETELY FINISHED WITH THE INSTALLATION. Like was stated earlier in this tread, theoretically,the bezel and installation process should work with any double din radio; however the Kenwood (DNX706s) I chose is a shallow mount unit with no DVD/CD player which eases the fitment issues somewhat. It also has the control buttons at the bottom of the screen and the bottom of the unit has a slight angle to it that flows with the section of the bezel below the radio. Also. the screen has a motorized angle adjustment that I felt important due to the fact that stereo is mounted at such a low position on the dash. I have already replaced all the speakers with the 2 ohm Infinities, so I have no intent to replace them again. Because I want the best sound possible, and still want to keep everything as "stock" in appearance as possible, I am going to remove the existing amp and replace it with a 2k watt 5 channel Pioneer. I am also going to replace the existing subwoofer with a 1 ohm dual coil Kicker as describe in another tread. The 1 ohm dual coil will be wired as to create a 2 ohm subwoofer to match the existing speakers. Next, I am going to mount the new amp in the truck area, and add a second 8"powered 250W Kenwood subwoofer under the drivers seat where the original amp was mounted. So, now that the bezel is cut and a "mock" installation has been done, I now need to fill the gaps on the sides of the new unit that remain from the dimensions of the old 1.5 DIN unit. I have never worked with epoxy plastics, and have minimal experience with body filler, though I have worked with them a few times with good success. Anyway, I am looking for some advice with regard to the best products and processes to use in the finishing process of the bezel. Once the gaps are filled, and the new USB/AUX port is installed, I intend to sand the bezel body smooth and to paint if to match the instrument panel. Thanks in advance for any advice with regard to the products and process of working with epoxy plastics and body filler. Looking forward to getting this project completed and making the install info available to anyone that might be interested in the process. I have pics and will post them once I figure out how to do so on this forum. This message has been edited by skb4076 on 08-10-2020 at 04:16 PM New head unit fitted to bezel Mock installation to check fitment. (Electrical tape covers gaps on sides of the head unit) Original bezel and "new" bezel after applying epoxy plastic resin to fill gaps on sides of head unit and auto volume switch opening and then shaping the opening facilitating a Dremmel tool and sanding block Still needs additional sanding and then the application of body filler in order to work into the finished product) This message has been edited by skb4076 on 08-11-2020 at 01:33 AM She is going to be beautiful and you did awesome work....HawaiiHaze Well, not having near the amazing fabrication skills that Richnew41 has, I challenged my local audio shop to see how they would squeeze a double-DIN head unit into the Prowler. I had given them a smaller vent unit so that they could cut out part of the bezel above the existing rectangle. However, they were able to somehow cut out a sufficient space without cutting into the A/C vents. Very impressive. So now, I've got a rockin' modern stereo with Apple Carplay and a much needed rear camera. Yay! 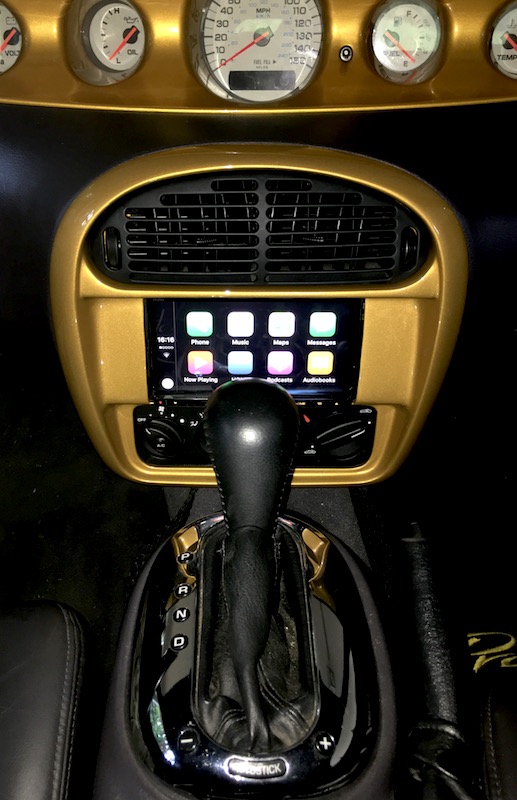

TucsonJer WOW! That looks amazing. Kudos to the audio shop. 👍 Stogie Very nice! skb4076 Nice!!!!! Richnew41 Awesome!!! They certainly went the extra mile to not only get it in but beautiful work indeed. congrats on an awesome mod!!!!! Largent This looks good - congrats on the new unit and successful mod.
It looks like the 12v port was sacrificed - is that accurate? alprowl quote:
Originally posted by Largent:
It looks like the 12v port was sacrificed - is that accurate? HawaiiHaze quote:
Originally posted by Largent:
It looks like the 12v port was sacrificed - is that accurate? 
BeWare Love it, want it. Doyle Did they make the bezel or did you buy it somewhere? If you bought it where? HawaiiHaze It was a stock bezel that they modified. I bought it from The Prowler Store, but it was identical to the bezel that was already in the car (I just got the second one in case the audio shop did a poor job, I'd still have the original). Doyle If I'm not being to nosy what did it cost you? I'd like to know what to expect. lol Also will any double din radio fit? HawaiiHaze I think the stock bezel cost me about $150, but can't remember for sure. Unfortunately, I don't have the cost for modification and painting of the bezel, as it was part of an overall package when upgrading my audio system. In addition to the bezel work, the audio shop created new speaker mounts for the doors to accommodate larger speakers, replaced all the speakers in the car, installed a Kenwood Excelon head unit, and added a rear view camera. Total cost was around $3,000. But that's a Hawaii cost. I would expect a mainland shop to charge substantially less. Doyle Thanks for your time and info. It's greatly appreciated skb4076 skb4076 After admiring Richnew41's bezel for over a year, and then seeing the bezel the stereo shop did for HawaiiHaze, I finally decided to take on the project of building my own bezel. Komanelli I can’t wait to see your effort! It sounds like a plan..! I should send ya my brother’s bezel on his Kat so you can have another to “perfect”...  good luck and post those pix
skb4076 


Komanelli Looks great man! Going to be a perfect modification! Richnew41 Fantastic job Scott!!!
Not sure if you have gotten to body filler yet but if not, I highly recommend using “EverCoat Rage Ultra” .... You can find it on Amazon....
It’s a million times superior to Bondo and will last a lifetime....
All material contained herein, Copyright 2000 - 2020