| Prowler-Parts.Com | Prowler Products By Gary | Tom Mills / Jefferson Auto | Prowler-Products Trunks |
| Home Page | Owners Registry | Discussion Forums | ProwlerMall | Event Scrapbooks | About |
| Prowler-Parts.Com | Prowler Products By Gary | Tom Mills / Jefferson Auto | Prowler-Products Trunks |
 Click here to return to the Prowler Online Board Main Page |
 ProwlerOnline, Plymouth/Chrysler Prowler Discussion Forum ProwlerOnline, Plymouth/Chrysler Prowler Discussion Forum
 Prowler Performance/Appearance Discussion Prowler Performance/Appearance Discussion
 Front Plate Mount-Better, Faster, Cheaper (Free!) (Page 1) Front Plate Mount-Better, Faster, Cheaper (Free!) (Page 1)
|
| Bottom of Page This topic is 2 pages long: 1 2 |
next newest topic | next oldest topic |
| Author | Topic: Front Plate Mount-Better, Faster, Cheaper (Free!) |
GRROWL      POA Site Supporter Prowler Junkie From:Herndon, VA |
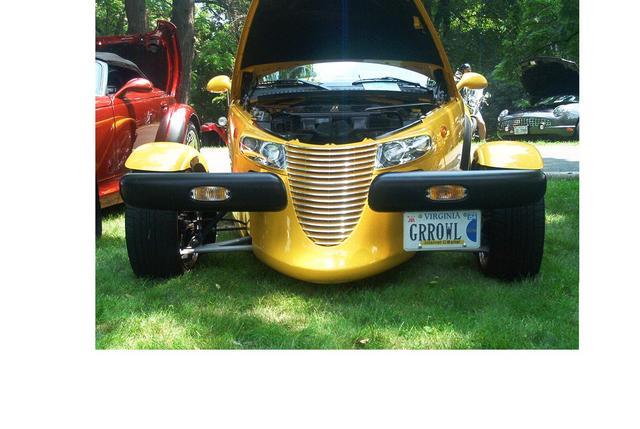
   This is my first post, so be kind. GRROWL is a 2000 Yellow Prowler. I have benefitted from the online discussion boards from day one (June 2000) and figured it's time to give something back. It always bothered me that they drilled into the bumper to mount the front plate, so at least there was some benefit when (out in left field at Office Depot, away from all other cars) some kid zipping around in a BMW snagged the bumper from behind and folded it into the grill. Those front bumpers really collapse when hit from behind. Soooo, while I was waiting for the new bumper to arrive, I did a post-mortem on the old one. Being off of the car and upside down on the workbench, it sure seems that Plymouth designed the bumper to take a front license plate mount the way I will describe below. Came back to edit and add a picture:
But first, a plug - and a thank you. As I said, I have benefited from this board in the past and ordered a new replacement bumper at a SUBSTANTIAL savings - THANKS, ALLEY CAT - those guys at John Youngblood Motors are phenomenal - and to get Mopar parts at such a discount is unheard of. Anyone interested should do a search for "cheap parts" posted by Alley Cat (by way of coincidence, my wife's pet cat is named Alley Cat). Back to the subject: Under the bumper, there is a recess approximately 1/2" deep and 1" wide with a row of pop rivets. The rivets attach 2 layers of plastic (front and back of bumper shell) to an aluminum box-beam. The location of the plate looked best (at least to me and to my wife - she's not particularly fond of GRROWL, and I'm not particularly fond of Alley Cat - her pet, not the POA member) centered under the directional signal. Coincidentally, two rivets are equally spaced from the centerline of the signal with matching holes on the top of the box beam, which is EASILY accessible by removing the directional signal (2 screws as if you were replacing the bulb). This is a CHEAP, GOOD and NO COMPROMISE solution. I believe that the end result is PERFECT (providing, of course, that the law requires you to have a front plate to start with). I dug the following out of my scrap box: 1 pc - 1" x 2" aluminum angle, 9" long This is really starting to sound much more complicated than it is. This is a 15-minute job requiring only an electric drill with a 1/4" bit and a portable belt sander or grinder. Here's the procedure: ---------------------- 1. Drill out the 2 pop rivets below the directional signal (all drilling is with a 1/4" bit). 2. Remove the directional signal as if you were replacing the bulb, just let it hang. Drop in 2 bolts (1/4" x 1-1/2") down through the holes you will find behind the signal and out through the pop-rivet holes. 3. Find a piece of 9" long 1" x 2" angle in your choice of materials. Contour the 1" edge to match the front curve of the groove under the bumper (the 2" face will then be hanging down at the rear. 4. Center the bracket below the light opening, drill 2 holes to match the new bolts (should be 5" apart, but check), and bolt on. 5. Drill 2 holes, 1/4", 7" apart, and bolt on the license plate. 6. Re-install the signal. Done! --------------------- Additional (overly complicated) points: A. No metal-working-specific tools were used in the production of this bracket. The portable belt sander worked well with an emory belt to contour the aluminum angle (which was 1/8" thick, by the way), round all of the corners, and ease the edges. I also used it to sand the faces to produce a "brushed" finish. B. You could just as well use stainless steel angle (if you can find it); plastic angle; or bend sheet-metal of your choice. You could also attach with pop-rivets (skip steps 2 and 6) or screw into the pop-rivet holes with 5/16" self-tapping screws. Again, this is over-complicating the issue for such an easy (and good) fix. C. You probably want to stiffen up the plate - I used a clear cover that did the job nicely. You could also use a backer, either the original mount, sheet-metal, plastic or whatever. I thought of taking pictures, but: 1. I'm new at this, this is my first posting, and this could come later if requested. Interested in hearing any reactions. Thanks, Prowler Online. This message has been edited by GRROWL on 07-04-2003 at 11:58 AM |
KenG POA Site Supporter Prowler Junkie From:Hamilton, OH, US |
Sounds like a GREAT option. Certainly a lot less than the 90.00 I paid for a piece of plastic. It's amazing what you can figure out when you take something apart. You better patent this fast or AC will do it and want royalties!  ------------------ |
Laddie Roussel               >POA Lifetime Site Supporter Prowler Junkie Personal ScrapBook From:Hester, LA. USA |
Welcome to the POA GRROWL... ------------------ |
Dave Mills POA Site Supporter Prowler Junkie Personal ScrapBook From:Johnstown, PA, USA |
Welcome GRROWL. We have no front plate in PA, so I never had to deal with that. Even if I had, I still would have removed the front bumpers. I don't think they do much good anyway. ------------------ |
CWatsonJr POA Site Supporter Prowler Junkie Personal ScrapBook From:Pollock Pines, CA, USA |
This is certainly the simplist and most cost effective way of handling the situation that I have heard of! Thanks for the great post and WELCOME .BTW - KenG is right, AC is on his way back from California and as soon as he sees this he will want to copyright it - so beat him to the punch!!!! OH - and you better copyright both right and left handed models of it ------------------ |
Wayne Finch POA Site Supporter Prowler Junkie Personal ScrapBook From:Toronto, Canada |
..well detailed instructions. Sounds great. I've not put one on yet and probably will not until requested by the authorities, but this is what I would do. Brian King has also done the same thing ------------------ |
BeWare POA Site Supporter Prowler Junkie From:Acworth , Georgia , USA |
Welcome Grrowl, thanks for the tip. GA does not require a front plate (lucky me). I am sure you have helped many others. Too bad some dealers drill the bumper and mount a dealer plate as soon as they get a Kat into inventory. ------------------
|
|
Paul POA Site Supporter Prowler Junkie From:Cedarburg, WI USA |
GRROWL have you actually built one of these recommended brackets and installed it? I look forward to your photos. ------------------ |
MeanGene POA Site Supporter Prowler Junkie From:Burtonsville, MD |
Welcome Grrowl, Plan to road trip that Bad Boy( your car) to MD, we live about 20 miles from each other! I take pics for you and you can post them. Plan on the Louisville trip in May! We have a "cat-o-van" going there and would love to have you join us. ------------------ This message has been edited by MeanGene on 03-11-2002 at 10:09 AM |
|
GRROWL POA Site Supporter Prowler Junkie From:Herndon, VA |
Paul - Yes, I actually built this - went without a hitch (having the old one to tear apart certainly helped to plan what to do ahead of time). If I had it to do over again, the only thing that I would do differently is make a paper pattern of the front contour and hole locations. I would especially suggest this if you are doing this with the bumper still on the car and working from below. I free-handed the curves until it fit. With a paper pattern, I would have just sanded (ground) to the line and the holes would have been easier to locate than using a scribe through the holes. And to MeanGene: |
ALLEY CAT POA Lifetime Site Supporter Prowler Junkie From:mesa, az, USA |
GRROWL - I'm honored to have your wife name her cat after me  , hope he is a male cat! , hope he is a male cat!Your idea looks painless to me, but since Az doesn't require a front plate and you did the leg work for me on this one ( The name for this will be: GRROWL/AC Front License Plate Mounting System and carries the ALLEY CAT STAMP OF APPROVAL The phone will be ringing soon!! ------------------ |
|
Kernel Prowler Newbie From:Columbus, Ohio, USA |
Ohio's "fix it" ticket is $80+ for no front plate. Ouch! Three choices as I see it. 1. Carry front plate inside car and hope for the best. 2. Mount plate in a broken license plate frame and keep inside car. Drill two holes in the underside of the "Y" brace where it meets the back on the bumper box. Screw in two worn, a little rusty, sheet metal screws almost tight, same distance apart as license plate holes. When the officer ask about the lack of a front plate, "Sir, (Sir is always a good call at times like this! ) my wife (sorry Carol) just ran up against a parking bumper at the mall. I'm headed home this minute to repair it." 3. Mount the plate and a metal backer (novelty front plate like you'd find at Auto Zone) in a cheap metal bracket with all four holes bolted together. Bend approximately the top one inch of the plate 90 degrees. Take common sense precautions not to scratch the plate's finish. Mount plate using its original holes, in the Y bracket where it meets the bumper box, with sheet metal screws. As its tucked under the bumper, the plate nearly goes away except from oncoming (police) cars.  ------------------ |
jkburns Prowler Junkie From:Mankato, Minnesota, USA |
Kernel: Outstanding! I vote for #1. Kevin |
Richard Jackson POA Site Supporter Prowler Junkie From:Fairfield, Ohio |
I got the real rod frame holder and I love it. http://www.realrod.com/lbbm.htm ------------------
|
Ricky310 POA Site Supporter Prowler Junkie From:Inwood Long Island NY USA |
Thanks Grrowl for the great advise on how to make the front plate bracket.I did everything you said.I went to Home Depot,bought a piece of 1" aluminum angle iron about 12"long,bolted that under the bumper, then bolted on the original plate bracket that came with the car.It's on there nice and strong and looks great. Thanks again, Rick |
FreeorDie2 POA Site Supporter Prowler Junkie From:Hudson, NH, USA |
I need to fabricate the same kind of setup for a front plate, but I didn't have as much luck at our local Home Depot. I asked for aluminum angle iron and they showed me 8 foot bars of aluminum. I asked for angle brackets and all they could show me were items for holding up shelves. I would be grateful if someone could help me with the right words to say or a better place to find an aluminum angle bracket!! |
|
GRROWL POA Site Supporter Prowler Junkie From:Herndon, VA |
quote: Home Depot ain't what it used to be, but they usually have a vertical rack in the middle of the hardware aisle that has 3' and 6' lengths of threaded rod, smooth rod, angle iron and ANGLE ALUMINUM. If you talk to someone who knows what "angle iron" is, you just need it in aluminum. I'd say try again, Home Depot definitely has it, it's just hidden these days. -GRROWL |
ed monahan POA Lifetime Site Supporter Prowler Junkie Personal ScrapBook From:Cincinnati, Oh, USA |
The bin is in the middle of a row, in the hardware dept. It is about 2 foot square and has about 30 different items in it. I have had a fit trying to find that stuff also. Every employee knows where it used to be, but they move it every week, apparently. I just bought some threaded rod last week. It is near the hinges, usually. This message has been edited by ed monahan on 11-26-2003 at 01:53 AM |
|
FreeorDie2 POA Site Supporter Prowler Junkie From:Hudson, NH, USA |
Thanks guys. . . I'll give it another try tomorrow. Part of the problem is definitely that I only think I know what I'm looking for, I don't really know what it looks like. I did ask two of the orange-aproned gentlemen and they both looked at me like I had two heads. I should have known there would be a problem -- I haven't been there in months and when I walked in, right in front of the entrance was a brand new huge display of kitchen appliances. It looked more like Best Buy than Home Depot. Thanks again. |
idive POA Site Supporter Prowler Junkie From:Texas USA |
If you look into the end of the angle, it looks like an L. The verticle part is 2" high, the horizontal part is 1" long. Now, as you turn that L sideways, it looks like a 3D L about 9" deep. I'd draw ya one here if I could. (Is that clear as mud in trying to tell you what it looks like?) It's a piece of structural steel. Ask for a piece of aluminum angle 2" by 1" (2"x1"). They should know what that is. figured out how to draw in paint... I hope this helps. 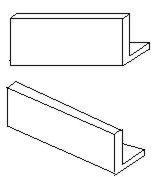 ------------------  This message has been edited by idive on 11-25-2003 at 11:36 PM |
|
FreeorDie2 POA Site Supporter Prowler Junkie From:Hudson, NH, USA |
Thanks, Mickey. . . I'm sorry you went to all that trouble. I mean, I do know what an angle bracket is, but after talking to the guys at Home Depot, I was looking at anything that could remotely be interpreted as an angle bracket. What I mean is, I had no expectation that I would find something in the size I was looking for and started looking at anything that I might be able to cut to size -- if that makes any sense. Anyway, I appreciate it. |
|
idive POA Site Supporter Prowler Junkie From:Texas USA |
Was no problem. I draw the stuff for a living. I just didn't know how to draw it in paint so I could post it in here. BTW, don't use the word "bracket". Thats what's confusing them. |
|
FreeorDie2 POA Site Supporter Prowler Junkie From:Hudson, NH, USA |
Thanks guys. I found the angle aluminum just where you said it would be at Home Depot. Of course, they only had it in 8' lengths, and only 1x1 (or 2x2, etc), but it cost next to nothing. I ended up doing it a little different from Grrowl's instructions, but it worked fine. Cut a 9" piece and trimmed it to fit under the bumper. Then mounted the original plate bracket to it. Everything else was the same. Worked like a champ. It seems real sturdy and looks great. Thanks again for your help! |
|
GRROWL POA Site Supporter Prowler Junkie From:Herndon, VA |
quote: Glad it worked for you. Using the original plate bracket is consistent, I couldn't use mine since it was damaged when the bumper was whacked, so I used a clear cover to stiffen the plate. BTW, how was it on the "Difficulty" scale? -GRROWL |
This topic is 2 pages long: 1 2 All times are CT (US) Top of Page Previous Page | Return to Prowler Performance/Appearance Discussion next newest topic | next oldest topic |
  |
|
All material contained herein, Copyright 2000 - 2012 ProwlerOnline.com
E-Innovations, LP


